Search This Blog

Monday, October 14, 2013

Another Tale of two Yaks__Flying The Twins


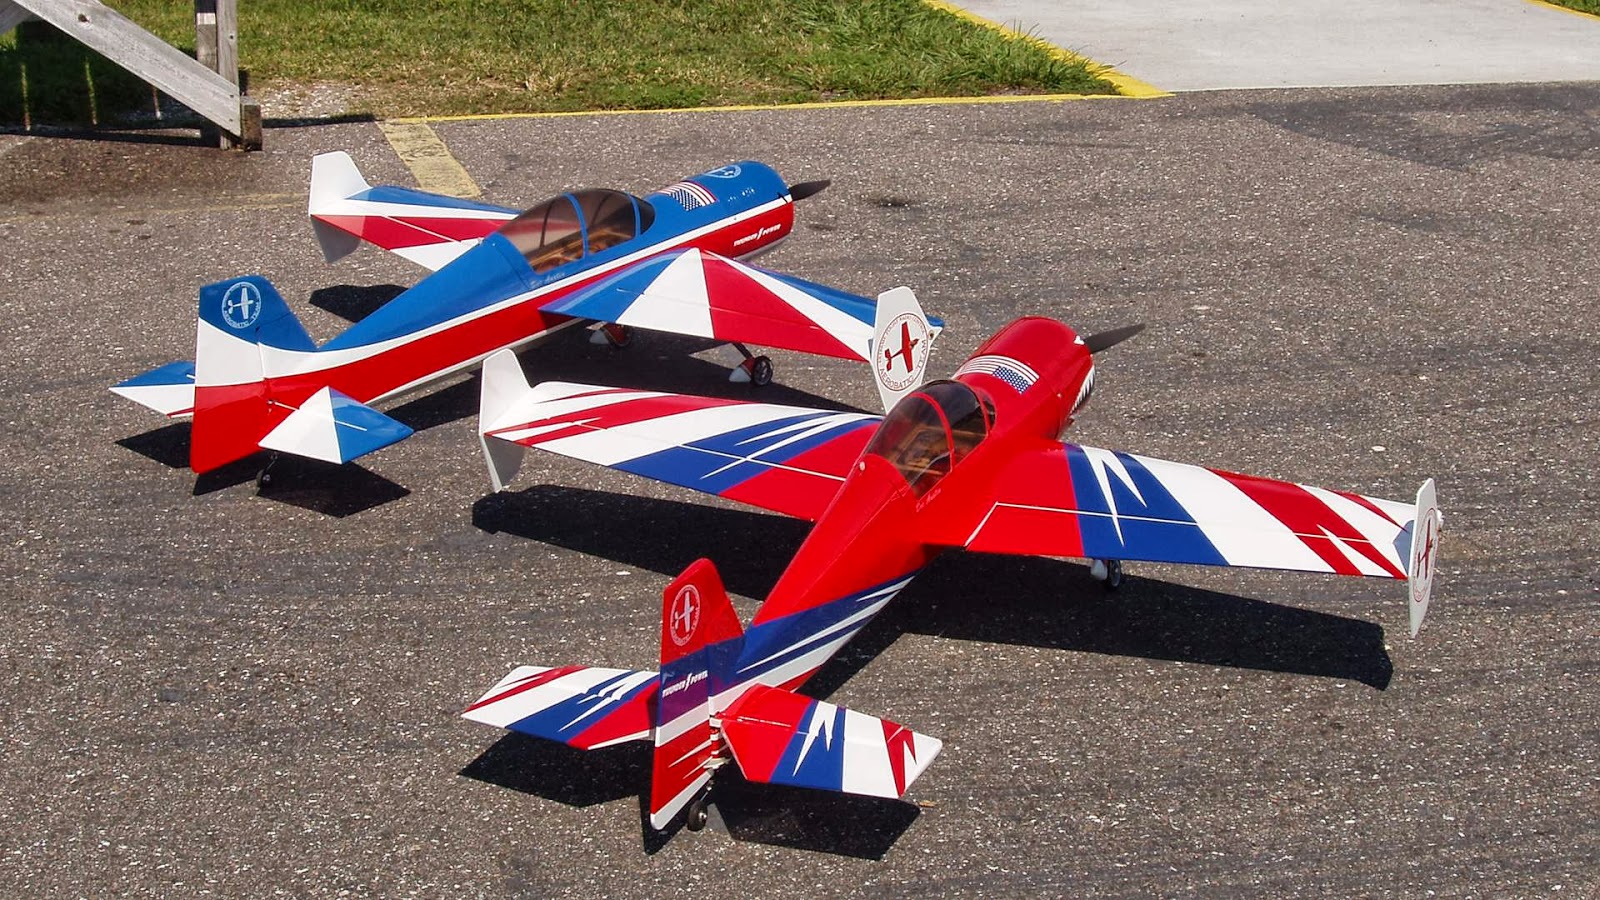
Well, not exactly. They aren't quite twins.

It was a bit of a dilemma when the red and white splinter scheme Yaks became available because I had just crashed my Russian Thunder. I have always liked that scheme, but the red looked awesome too. Being unable to decide, I didn't even try, and I got them both.

You gotta have a backup, right? Except, after flying the red Yak, I also couldn't make up my mind which one I wanted to be backup. Not being able to decide, I fly them both!

Click To Enlarge

You might notice my Russian Thunder looks a little different from the others you have seen. I used the white (instead of blue) SFGs from my last (and late) red Yak to brighten up the plane's visibility. I am closing in on senior citizenship, so everything I can do to help me see the plane better is worth it. It seems to have worked well.

In later pictures you will notice I also used the red/white wheel pants from the red Yak, only I replaced the blue trim with gold 3M high performance vinyl striping. I love working with that stuff!

Dialing In The CG
First, the Yak is not temperamental or hard to set up. It just rewards you more if you take the time to get it spot on. It's also simply a different kind of plane that flies a bit differently and likes a bit different set up. None of this is hard. It's the same thing you go through with any other 3D style plane, but with the Yak, having the right set up makes it really come alive. If you are lazy, this isn't the right plane for you, but if you take the time to get it right, it's an amazing airframe.

The Yak seems to be a bit different from the other EXPs in that it is a bit less forgiving on the center of gravity (CG) location. Initially I started off nose heavy, because I generally like them a little forward of having a neutral CG. A little nose heavy makes the plane track and groove better at high speed, but it also makes 3D a little bit more difficult. Everyone seems to prefer something different, and lately I have been moving my CGs back and trying to get closer to neutral.


For this plane, that was a good plan. I just wasn't comfortable flying it really hard. It wasn't bad by any means, but I knew I was not getting the most I could out of the plane. The more I moved the battery pack back, the better the plane felt. Now I can drive it around all day with the nose pointed way up there, and turn it extremely hard on the rudder in a harrier, and both directions too.

Once I got the CG where I liked it, then it was a matter of learning to grab that elevator and hold the nose up as high as I could get it. That was the final step in gaining complete confidence in this airframe, emphasizing once again how critical set up is on all high performance planes.

Click To Enlarge


I always suggest starting with the CG from the manual, but this time for experienced pilots, I recommend starting at the rear of what the manual calls for. That will get you really, really, close, and from there, it's a matter of personal preference where to put it. Don't be afraid to move that CG back, but do it in small increments. This way, if you get too tail heavy you can get it back down without a lot of drama,  and then move the pack back forward.

I got mine too tail heavy and it was not a big deal to land, make the adjustment and then everything was perfect. I generally keep moving back until it gets too tail heavy, and then go back to where I was the flight before.

The Yak has me re-evaluating how I set the CG on my planes. I was already moving the pack back on my Extra EXPs, and now I think I am beginning to prefer something closer to a neutral CG instead of slightly ahead of that. We will have to fly and experiment more, which ain't a bad way to spend an awesome Florida October!

Click To Enlarge


Crazy spins
With the yak having all it's thrust and flying surfaces on a central datum line, everything snaps, rolls and spins on a single axis. Since the components are not fighting each other, the Yak is a bit more agile on that axis.  As a result, I have dialed my aileron end point controls back from 150% to 125%. It rolls so fast that I simply don't need that much, and I can fly it smoother with a little less throw.

One thing you will see on the following video is a crazy spin I came up with. I did it by screwing up a blender and giving it the wrong control. As with any violent maneuver, speed is your friend, so I start by diving the plane straight down, and let it build up to terminal velocity. Yes, this is hard on the airframe, but the EXPs are so hearty that they can take it.

Then, I put the plane into a full right aileron roll heading straight down. From here, the drag on the ailerons slow the plane a bit, so you only want to do two or three turns before you slam in full right rudder and down elevator, and then hang on. The Yak goes absolutely batsnitt crazy. It spins so fast that I simply can't keep up with it and it never comes out pointed where I want it too. If you try this, I heartily suggest you leave yourself a fat margin to the ground, at least the first few times.

Go to 0:45 to see the spin. This one was a bit too low, but we're shooting more video today with Russian Thunder and we'll try to get another one.


Red Splinter or Russian Thunder?
Tough choice if you can only have just one. The Russian Thunder is about as classic as it can get, though the EXP version is modernized a bit and the wing and stab have matching patterns. When the wing, stab and fin are all different patterns, that makes my OCD go a bit whacky, and severely offends my sense of symmetry. I very much like what The Boss did to make this version of Russian Thunder so pleasing to look at.

The Red Splinter scheme is also very symmetrical, though admittedly it does have a bit more visual pop. It is a very visible scheme, made even more so with the underside of the wing sharing the same checkerboard pattern with the Extra EXP. While this is a small detail, I would love to see the bottom of the red Yak's horizontal stabilizer match the wing instead of being pure white. I may cut up some black 3M high performance vinyl and slap it on my red Yak.


Friday, October 4, 2013

A Tale of two Yaks__October Buildfest


The flying report and video will be after the build and set up sections of this article.

It's been a tough year for Yaks. I destroyed a Russian Thunder Yak EXP simply by getting too crazy with it (certainly not the plane's fault), and then I killed a brand new red splinter scheme Yak just trimming it out for high speed. I was so focused on the plane that I never saw the ground coming. They were both stupid crashes, but thankfully I was able to acquire one in each scheme in time for my annual October build fest.

 
In spite of a little bad luck (and stupid flying), I have really enjoyed these Yak EXPs. They are a bit of a different kind of challenge, but it is certainly a capable enough airframe. I've had Yaks from other manufacturers that were downright deadly if you rotated them hard in that no-man's-land between alpha and on-the-wing, but the EXP exhibits none of that.

I  did kill a couple of these, but it was a valuable learning experience, plus I got to build some more of them, which is always great. I learned enough from flying the last one that I think this could eventually become an equal favorite with the other EXPs, but first we need some more stick time.


The Kit


All of my Yak EXP kits have come out of the box looking nearly perfect. The factory really stepped it up this year as far as making beautiful builds and these Yaks are something else. I usually spend a lot of time getting the covering right, but on these Yaks, as well as the Edge EXPs I have built recently, there was very little to do except iron down a few seams.

The Yak features many of the newer build techniques found in the Laser, such as angled motor box, and  wing panels that recess into the fuselage sides. Composite usage is reduced from earlier EXPs, because it was an expense that wasn't needed.

For example, the angled motor box is much stronger than the older version that was supported by carbon rods. As you can see, you still  have plenty of room for getting the battery in and out of the plane, and this is without sacrificing any strength.


 The actual landing gear (LG) block is still G10 composite, though it is reduced in size, and the block itself is now reinforced to the formers with triangle shaped longerons running side to side. The composites were reduced to save money, but the strength was retained with superior engineering.

The Yak still has some carbon, and it's in the bottom of the fuse, running full length from the LG block all the way to the servos in the tail. This is one area that carbon is very useful because it makes the bottom of the fuselage very stiff without adding unnecessary weight.


Of course, the Yak uses the same hardware pack as the rest of the 48" lineup (though the MXS has a longer rudder pushrod), which means smooth, drag free ball link hardware, lightweight axles, and Extreme Flight's exclusive tail wheel assembly. It's all first class stuff and it's nice that you only need a handful of spares to cover the entire fleet.

The carbon gear leg is a bit different, though. It's much longer, with much better ground clearance, suggesting that perhaps the Yak was meant for a bigger propeller. I keep hoping we will get a Torque that will spin a 14" prop. Right now The Boss is in China, so let's see what he has for us when he gets back.

The Build
Every October I like to build out in the garage with the doors and windows open so I can enjoy the beautiful Autumn climate. In Florida, by the time September rolls around, everyone is desperate for it to cool off even if just a little, but it is usually Mid Oct before it gets really nice. Since I have a good supply of the other EXPs built up, now was a good time to tighten up the Yak fleet.
 

One of the things I love most about the EXP series is how well the radio installation is already thought out for you. The receiver mounts where all you need is a single 3" extension on each aileron and they plug in with just the right amount of slack. There are holes on the corners of the former to run the wires through and this keeps them from slapping around too much. Also, any extra extension wire from the servos in the back can be pushed back into the tail and it generally stays there, giving you a very, very neat installation.

That sure is a pretty battery!

I saved myself a lot of time on this plane by removing the servos from the old plane with the push rods attached. I unbolted the ball link from the control arm and lifted the whole assembly out as one unit, then dropped it into the new plane. On all surfaces, it only took a turn or two on each servo arm, which I think is a remarkable tolerance on something that is built from wood.

I also didn't have to monkey around with servo extensions because they were already done. The power system was already set up and bullet connectors heat shrunk, so that saved some work too.

The tail wheel assembly was undamaged in the last crash, so all I had to do was bolt it on. I like to file flat spots on the wires where the grub nuts secure the tiller arm and wheel collars. This gives the nut a larger flat surface to bite into, and keeps the tail wheel wire straight. It's also a lot less likely that the tail wheel will fall off!

From there it was a matter of assembling what came in the box, and this particular Yak was outstanding, even in comparison to other EXPs I have built recently. Sometimes you have to struggle to get the wings on because they can be a little tight and the alignment pins can be stubborn, but the wings on this one slid into place perfectly on the first try.

I would have been mildly disappointed that this build was too easy, except the decals on the nose gave me a mild fit. Stretching the shark's mouth around the nose left the decal all scrunched up and wrinkled, and it took some doing to get it all smoothed out. Even 3M high performance vinyl has a tough time going around double convex compound curves, but the nose really came out nice.


Yak wheel pants are a bit odd. My understanding is that, as a Russian plane, the Yaks were flying out of all kinds of places that have mud and snow, which can build up inside a conventional wheel pant. The Yak wheel pant is more like a fairing that breaks up any turbulence coming off the tire. One thing nice about the Yak fairing is that it sits high on the axle, and they don't get scuffed up on the runway very much.

These pants are painted red and white, with the blue stripe being a decal that is supplied in the kit.


Set Up
 Generally I bury the push rod as deep as it will go into the ball link that bolts to the control horn, and then make any adjustments by taking the arm off the servo and  turning that end. Most of the time that end too is very close to being bottomed out, but that's good because you have the maximum amount of threads in the ball links and they are about impossible to pull out.

Like always, I set my EXPs up by the book with one or two exceptions. Most notably is that I used an HS85MG on the elevator. This gives me a little more weight in the tail and I can now use the Dubro heavy Duty servo arm, which boosts elevator throw from 76 or so that you get out of the included G10 servo arm extension to a full 88 degrees.


I didn't find that I needed a longer arm for the rudder, though. The standard Hi Tec single arm that comes with the servo is enough. I miss hitting elevator with the rudder by about 1/4", so that's close enough.


Ailerons are exactly the same as they are on the other 48" EXPs, but this is a good thing because it is about as foolproof, goofproof and murphyproof as they could be made. You have ball links on both ends of a short, stiff push rod, giving you smooth, drag free operation without any looseness or slop.  This is exactly what you need for a silky smooth and precise flying plane.

 
One setup deviation is on my aileron low rates. The low rate from the manual is a little bit too fast to give you a perfect three rolls in five seconds, so I shoot for that. It is usually not all that different from the manual, but it's different enough that I take the time to get it just the way I want it.


FLYING
 
Harrier was a bit tricky at first, but not unmanageable. I found that the Yak seems to fly better for me if I get it very close to neutral, and I did not try that until the last one. I put a heavy tail wheel on the plane and it was completely transformed. Before I was getting a bit of wing rock, but balanced properly you can drive the Yak EXP around with the nose way up in the sky with complete confidence.

The Yak's strong suit is in it's rolling maneuvers. The wing, stab and thrust are all on one common datum line, so everything rolls on the same axis. On other planes sometimes the thrust and/or stab is lower or higher in relation to the wing, so in a roll they sort of orbit around the wing's roll axis.

With the Yak's central set up, everything rolls together instead of fighting each other, and rolls are very, very pure and axial. This makes for absolutely straight down axial spins, though the Yak will go another 1/4 to 1/2 turn after you let off, simply because it's going so fast.

Back to harrier and elevators and such, with the CG more toward neutral, the Yak harriers with it's nose way up there. I need a bit more stick time, but I think this might be even easier to harrier than the other EXPs with the exception of the Edge.

We shot this video in the dying light, so it will look a lot better if you view it in a dark room. Sunsets seem to be very difficult or cell phone type cameras, but the sky was so spectacular we wanted to shoot it anyway. We have more video in the can, and we'll post it in a few days after I have a chance to edit it down and get it up on Vimeo or Utube.

For now, though, you can clearly see I am getting pretty comfortable with my new Yak, and I've also got a Russian Thunder on the bench.


EDIT: I finished up my new Russian Thunder Yak EXP and I am really pleased with it. We'll be getting video with both planes shortly.


I wanted to do something a little trick on these wheel pants. They are left overs from my last departed red Yak, and I put a gold stipe on them with 3M High Performance vinyl.


Or new pilot, "Spook" approves.


The white on the nose looks good, but since I had the gold vinyl on hand I covered this part. I think it's a nice contrast.


 Spook seems to approve.