Search This Blog

Thursday, December 28, 2017

52" Extra EXP__One Year Endurance Test


A year is a long time in the life of a 3DXA airplane. Even under the best of circumstances it's going to take a solid thrashing, and when it becomes your daily beater then the abuse really gets heaped upon it. My beloved 52" Extra EXP 53A began as an experiment, and has always been flown hard. It's been a little over a year since her first flight and this has been an exceptional plane, which is saying something for a plane that comes from such an exceptional line up.

At the time this project began, money was especially tight, and I did not think this out very well when I ordered the plane. When it came time to order the servos, I had about $50 disposable cash left, so I had to improvise. I took a set of highly abused Hitec HS85MG servos and sent them in to Hitec for service.
These servos had problems that ranged from stripped gears and broken cases, all the way to another that didn't run at all, and one that had it's servo plug ripped off the end! When I got them back they were in brand new-like condition and apparently ready to roll, for $45 including shipping. This certainly beat spending $120 for new ones, and I didn't have that money anyway.


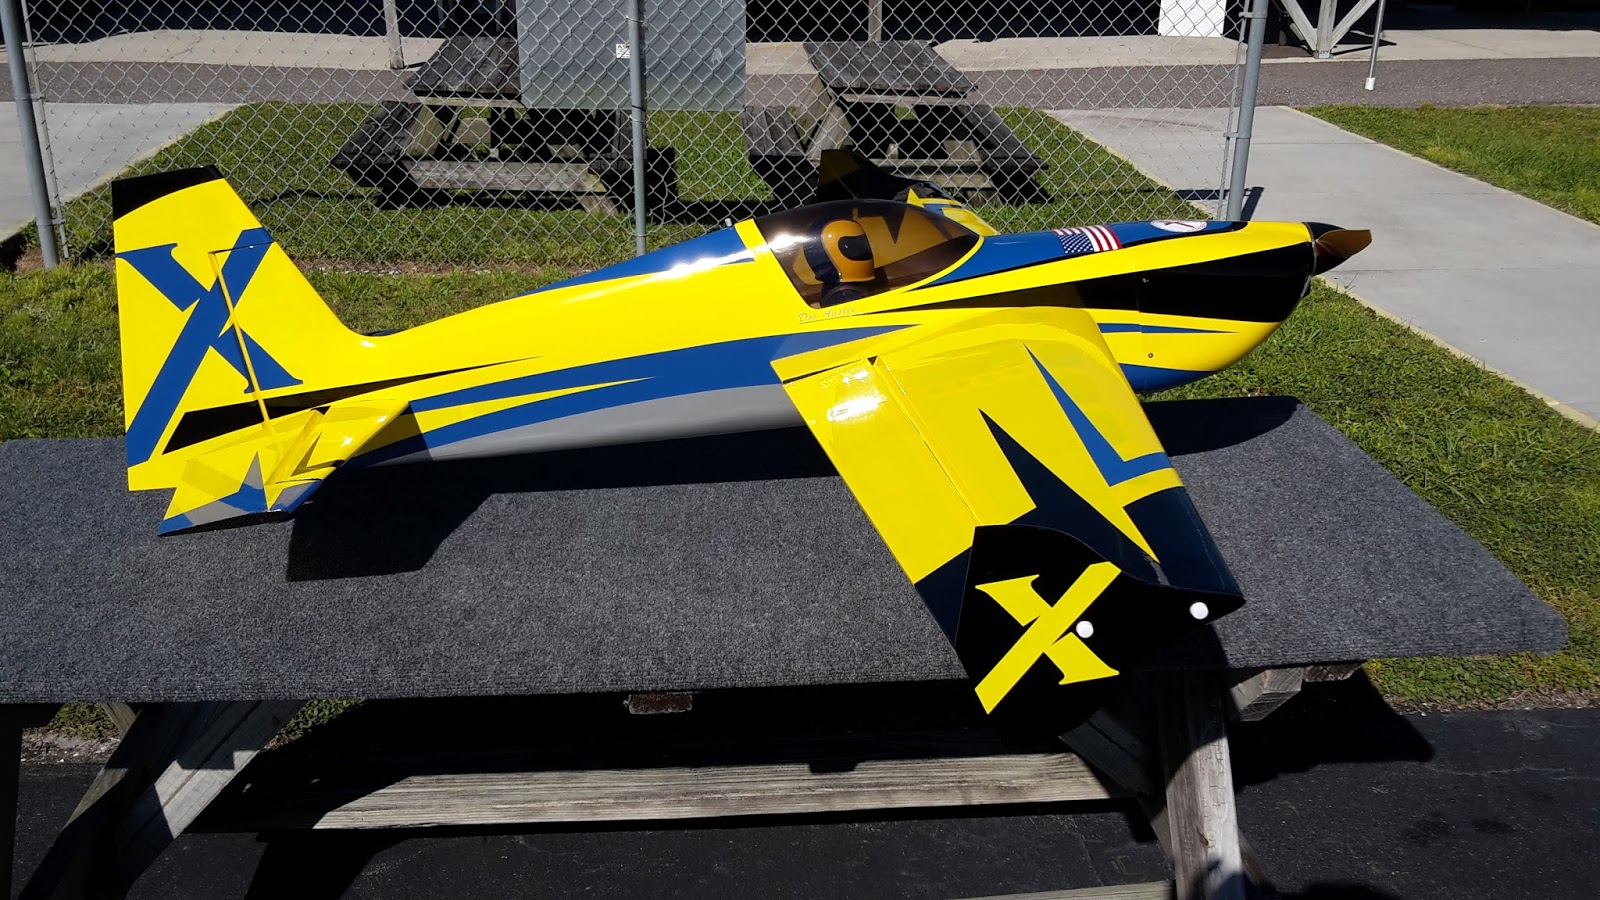
You might notice the absence of decals on this plane. Usually I like to take it out a few times to cycle it in and out of the air conditioning, into the sub light and generally see how the covering is going to hold up. It usually loosens up a little, and it's far easier to tighten it back up if there are no decals on the plane. This time, though, I love the scheme so much I preferred to keep it simple and clean.


While this was not the ideal way to start a project, Hitec service has always done exceptional work for me, and in a lot of ways a rebuilt servo can be even better than a brand new one. When I was in the audio business I learned that electronic equipment usually fails in the first 30 days, or never at all. If you can get past the initial burn-in period, electronics tend to run and run and run. Since these servos had already been through the wringer, it's safe to assume they were past that burn-in point.

So, I fearlessly dropped them in. You can read about it in 52" Extra EXP__What To Do With Your Spare HS85MGs.  Here it is worth pointing out that Extreme Flight recommends Hitec's excellent HS5087MH high voltage servo and the HS85s don't even get a mention. Running these servos is something I took solely upon myself to try. Your results could vary, but all I have to offer you is what's worked for me.


Flying


It's no secret that I am an Extra man. I've always loved Extras, from my first SHP through the 48" EXP and 60" EXPs and right into the 52", which might be my favorite of them all. As with the Slick, there is something about the 52" format sets this series apart. In general, they are far superior to the 48" span planes, and fly nearly as well as a 60". The 52s are still a very convenient size, and since they fly so nearly as well as a 60", I predict 52 is where it's going to be at in '18. We've been told some more 52s are in the works, and I am shifting my focus to these planes.

I kind of lost track of how much time I put on this plane, but it was a lot. I was so pleased with it that it became my primary plane, so it was out there three or four times a week grinding out the flights. I flew it hard too, and have become really connected to it. In a lot of ways I equate this plane to my first 48" Extra EXP, which was also blue. Both were beautiful, graceful planes that opened new worlds for me. The 48" Extra redefined what I could do with a 3DXA plane, and the 52" is showing me how to do it all better.


Mostly the Extra does things the way a plane is supposed to do them. You may notice when I do breakdowns of any plane's attributes that I always compare them to the Extra. The Extra does not always do everything better than all other planes, but it still does everything well enough that all the other have to live up to it. The Extra is truly the benchmark all 3DXA planes must be measured against.


Extra EXP__Long Term Abuse Testing 002 from Doc Austin on Vimeo.
Long Term Equipment Evaluation
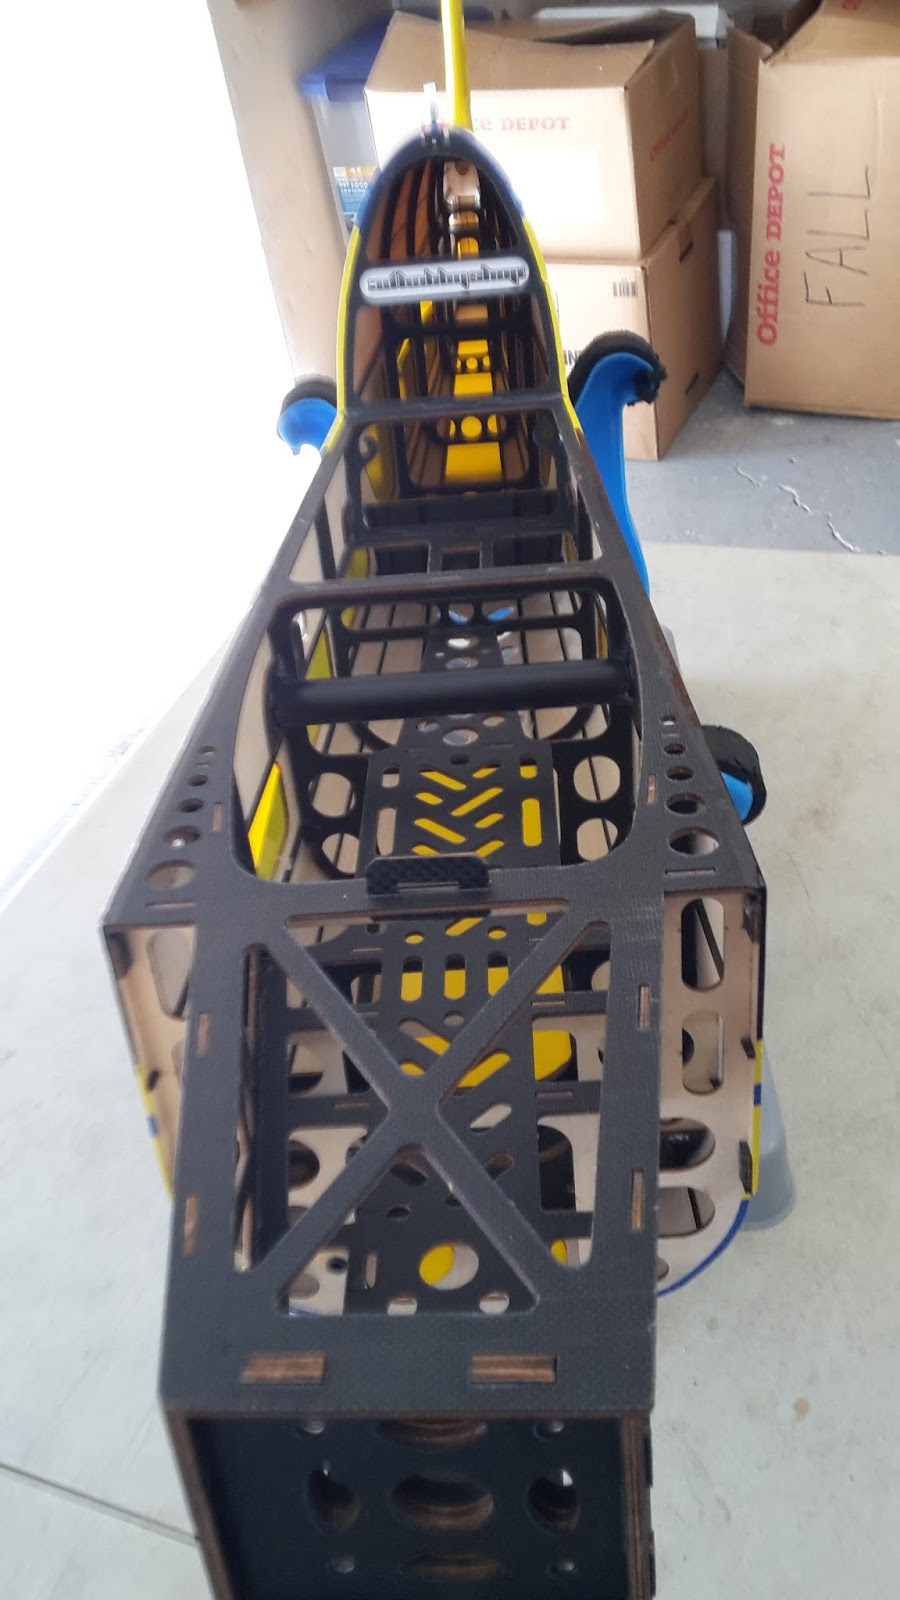
After a year's worth of abuse, I took the plane completely apart to see how things were holding up. It was all surprisingly good news.


First, let's talk about the power system, because there is the least to say about that. I plugged it in, forgot about it, and flew the crap out of it. That's it. That's all there is to it, and that's exactly what I have come to expect from Xpwr systems. I get explosive power and speed, and such reliability that once I bolt the cowling on that's the last time I think about the power system until I move it into another plane. While all of this might not make for riveting reading, it certainly makes grab and go flying a reality.

Not much to say about the airframe either except it still looks and performs like new. It helps I've become a little more careful with my planes and have stopped bouncing them off the ground as much, but this is a pretty sturdy beast anyway. Since I built the plane I have done very little maintenance, and it only took about a half hour with a sock covered Monokote iron to get the Ultrakote drum tight and flattened down on the wood. Generally I don't like Ultrakote, but I think working with it over the last ten years has taught me a pretty good technique for getting it nailed down. The biggest secret I have found is using a sock on the iron. It puts the heat where you want it and provides enough cushion that you are less likely to dent the wood, and it's soft enough that you don't scratch the covering or dull the shine. My planes look a lot better since I started using this method. This planes has looked great for a year and it did not need a lot of attention. I only worked on the covering because I was going through the entire plane, and I am pretty obsessive about keeping my planes nice. For the airframe, the worst of it is that it simply needed a good cleaning. While I had the servos out of it and the cowling off, I wiped all the covering down with lacquer thinner and that got it spotless.

Focusing on the servos, these HS85MGs have performed admirably, especially considering that they were in such rough shape before I had them serviced. I did not have one instance of stalling or blowback, and these servos are nearly as fast as the high voltage HS5087MH. Of crucial importance to me, these servos also center extremely well, so the plane trims out and stays trimmed out. You can't fly decent precision maneuvers if the trim keeps jumping around, and it takes the fun out of flying when you are constantly trimming the plane. On this plane, I trimmed it once and forgot about it.

After a year's worth of beat down, the servos are still working well. Since they were as good as dead before servicing, this speaks really well of Hitec service. Three of the servos were getting sloppy gears, but this is no surprise because they were starting to get a little of that when I sent them in for service. Remember, these servos were a collection that had been abused, thrashed and crashed. It's not even really fair to the servos to expect anything from them at all. They had already served me well past what you could reasonably expect, but service gave them a new life. That, and as you can se from the video, even after I wore the gears pretty ragged the plane is still really locked in. A full year on worn gears serving in my primary plane was a little too much to ask from them, so I replaced them with four more used HS85MGs that I also had serviced. The servos I just removed will go back in for new gears, and that will give me another set of essentially new servos.


All of the video was shot with the first set of servos, but I have since taken the plane out with a fresh set of rebuilds and she is better than ever, which says a lot considering she has been already  pretty jolly awesome. . She is trimmed and the CG is totally locked in and this is absolutely my #1 Plane,

So, we are set for at least another year of abuse, and probably even more if I can avoid the ground or banging the elevator when loading the plane into the car. This plane has been especially robust and reliable, and it's performed well enough to bring me a lot of joy.

This has been a jolly damm good project.


Thursday, December 14, 2017

52" Slick__More Fun With Hitec HS5085MG Servos

Doc's Disclaimer: Extreme Flight recommends Hitec HS-5087MH Digital HV Premium Metal Gear Micro servos for this plane. Using HS5085MGs in this plane is something I took solely upon myself to try.

The spectacular new 52" Slick and Extra EXPs are selling so well that occasionally retail outlets will run out of the recommended Hitec HS5087MH servos. When this happened during a build of my latest Extra, my friends at Hitec recommended I give the HS5085MG a try. That project remains a delightfully surprising success. I love that plane and fly it often. You can read about that in Even More Reasons To Fly The Extreme Flight 52" Extra EXP. That project went so well, it was only natural to want to try the 5085s in a Slick 580.

While the 5085 works really well for me in the Extra, the Slick 580 could be a completely different story. The Slick has a very tumbly, gyroscopic nature, and in a hard snap or tumble it can almost chew it's own tail off. The Slick is capable of some pretty incredible violence, and a much harsher test of a servo than the Extra. With this in mind, we were going to give to give it a try!

Worth noting is that the Hitec HS85MG, HS5085MG and GS5087MH are all built on the same servo case. Therefore, it's external dimensions and mounting holes are the same, and all three of them will happily drop right into the 52s pre-cut and pre-drilled servo openings. We used the HS85mg and 5085mg for the better part of a decade in the 51" Slicks, and with near perfect reliability too, so it is always confidence inspiring to work with products that have performed so superbly in the past.


Specs And Stuff
Mostly I have found Hitec servos suit just about everything I have flown in the last ten years, so I don't spend a lot of time pouring over specs and comparing servos trying to find that extra one ounce of torque or tenth of a second in speed. I'm not a spec guy and this isn't a tech blog. I just share what works for me.

 I just fly them hard and they either work or they don't. So far I have been happy with all my Hitec servos, but if I ever found one lacking the plan was always to upgrade to the next best Hitec servo, which so far has never been necessary.

  However, I know some of you want these details, so here we go.............


HS-5085MG Servo Specifications
Performance Specifications
Operating Voltage Range (Volts DC) 4.8V ~ 6.0V
Speed (Second @ 60°) 0.17 ~ 0.13
Maximum Torque Range oz. / in. 50 ~ 60
Maximum Torque Range kg. / cm. 3.6 ~ 4.3
Current Draw at Idle 3 mA
No Load Operating Current Draw 290 mA
Stall Current Draw 2150 mA
Dead Band Width 2 µs
Physical Specifications
Dimensions (Inches) 1.14 x 0.51 x 1.18
Dimensions (Metric) 29.0 x 13.0 x 30.0
Weight (Ounces) 0.77
Weight (Gram) 21.9
Circuit Type G1 Programable Digital
Motor Type 3 Pole Metal Brush Ferrite
Gear Material Metal
Bearing Type Top Ball Bearing
Output Shaft (type / Ømm) Standard 24
Case Material Plastic
Dust / Water Resistance N / A
Connector Gauge (AWG) / Strand Count 28 / 20 


Advantage Of Simplicity
The 5085 is a 6 volt servo, and this plays out in a simple installation that does not require a separate BEC and it's associated rat's nest of extra wiring, solder joints and complexity. You simply plug the Airboss 80 straight into the throttle channel of your receiver, let the Airboss' onboard 6 volt BEC do it's thing, forget about it and fly. Like this this Airboss' on/off safety switch still works, an important part of my preflight procedure for making sure I don't have a nasty propeller accident.


Here you can see how well the Airboss snuggles into it's designated location. With the absence of an separate BEC, the installation is much cleaner with less wires and less clutter. The standard Airboss installation and operation is what I have become used to over the last 10 years and, as such, this is the way I like doing things.

More Simplicity
Something else worth pointing out is how Extreme Flight has cleaned up the radio installation. Using hooks cut into the formers, you can restrain the servo wires so they don't flop around, and they stay out of the way when you are working in the radio compartment. This also looks very professional, so it's a win/win.


Xessories
Once again I relied exclusively on Extreme Flight's brand of aftermarket accessories. I love the servo extension and servo mounting screws. For this project  I was a little short on funding and was not able to buy the terrific Xessories servo arms, but I can always add those later. You can read more in Once again I relied exclusively on Extreme Flight's brand of aftermarket accessories. I love the servo extension and servo mounting screws. For this project I was a little short on funding and was not able to buy the terrific Xessories servo arms, but I can always add those later. You can read more in Xessories Update.   


Set Up
Nothing new or exciting here because all that is important is that it simply works.
I have notched that the ball links that have come with my last few kits work much more smoothly with less drag. I usually tinker with the ball links a little to loosen them up, but on this kit all I did was bolt them on and they did not need any further attention. I was so easy I felt a little guilty, so to ease my conscience I put a drop of silicone oil on each one. I used to put a lot of effort into this part of the build, because it was as important to get it right as it was annoying. It's nice that now it's a bolt on, no tinkering operation.


Elevator Set Up
Nothing special here except Extreme Flight's excellent and exclusive G10 servo arm extension. I do something a little different from most people here, and instead of using the arm that comes with the servo, I use the anodized blue metal arm that comes with the HS7245MH (and other  Hitec) servo. This is a metal arm that will not get sloppy, wiggle around on the servo output shaft, and give you a sloppy connection. The arm stays tight, so I believe this is probably the best arm for this application.
Aileron Set Up
Once again I turn to the reliable Hitec PN55709 arm set, and I use the shortest arm, with the ball link on the outer hole. The Slick seems to have a slightly faster roll rate than the Extra, so for this plane I am most comfortable with the end points set at 125%.


 Rudder Set Up
At the risk of being repetitive, once again it's the Hitec PN55709 short arm.  I have the end points on my transmitter cranked to the left, and I only have to back it off 10% or so to the right.  This gives me full deflection in both directions.


While all of this seems too simple and too easy, that's actually a good thing. Simple means it is much less likely to ever fail, and easy means you are more likely to get it put together right. Simple and easy are two extremely solid concepts that pay big dividends on any build.
Flying
I was pretty confident these servos would be really good in this plane, and that's exactly how it worked out. The 5085 is about 10 years old (maybe even older). It is fully developed and refined, so they have plenty of speed, power and precise centering.


Just like the 5085mgs in my Extra, the Slick trimmed out all by itself. I did not touch the trim levers all day. It was perfect. The Slick also stayed trimmed. This tells me that centering is exceptional, but we knew this from the 5085 Extra test.


Speed is really good and I can't tell much difference between this and the 5087mh. No stalling, no blowback and I expect the same kind of reliability I have always had with Hitec producys.
Generally I am tickled silly with this plane for a lot of reasons. It was an effortless build, the build was also flawless (a first for me) and it flies perfectly. This might be the nicest plane I have ever owned. As far as overall project satisfaction goes, this one gets a 100%. 


We usually try to shoot two or three videos, but today was so much fun we forgot that's why we were there! I flew the Slick all day and by the time we got around to shooting we were all tired and hungry. We'll try to get more tomorrow and maybe do a separate flight report.


Slick EXP__Testing 5085MG from Doc Austin on Vimeo.


Tuesday, October 31, 2017

Xcessories Update


Right at about a year ago, Extreme flight began releasing some of their own brand of hardware and accessories under the Xcessories name. At the time is was one or two accessories, but now it's grown to where we need to roll it out there and show you all of the Xcessories that make life easier and the build of any project go more smoothly. Every Xcessory is top quality, which makes sense because we will be using them on the most top quality planes. There is not a lot of sense in building a top quality plane and then using junky accessories to finish it off. For one thing it looks cheesy and out of place, but more importantly, poor quality accessories can sometimes fail and cause you bigger problems, like a nasty crash. It gets back to the weakest link in the chain, and with Xcessories, the last weak link has been eliminated.


One huge advantage to the Xcessories lineup is that you can now order absolutely everything you need for your new plane when you order it. You only have to order from one plane, it all comes in one box, and you only have to pay one shipping price. That last part alone can save you a lot of money.

There are a lot more quality Xcessories that I am going to cover here. As a 48-60" span specialist, I don't really fly larger or gas powered planes, but Xcessories has part for those planes too like the excellent Blazing Star engine mounts and Flo Master fuel tank


Xcessories Rockin' New Extended Servo Arms
The harder we started pushing these planes, the more we had to look at improving areas of performance. Part of this naturally led us to a critical look at the servos and linkage system. When you use a long arm, anything wrong in the linkage system is greatly amplified. We are running at least four times as much (and sometimes more) throw than you would run on a sport plane, so if you have something like a draggy ball link or sloppy servo arms, problems with getting the control surface to center are going to be about four times as bad as you would normally expect. This is simply unacceptable.

 Years ago we went to ball link connectors on both ends of the pushrod to assure drag free and slop free connection and smooth operation. This was a big step forward, but then we needed to look at the servo arms too. We were getting a lot of slop in the plastic arms we were previously using. The plastic splines would spread out under load and then the servo arm could wobble around on the servo output shaft. Now, we have slop in the linkage system again, which affects centering of the control surface. The servo will center fine on it's own, but with slop in the pushrod system the surface may or may not. This makes trimming the plane for precision maneuvers virtually impossible, and you'll spend the entire flight either fighting a plane that won't stay trimmed, or chasing the trims the whole time. Neither way is not much fun.

I tried a few aftermarket metal arms too, but no one made an arm that uses the 2mm hardware that comes with the Extreme Flight 48-60" span kits. Basically we were stuck with plastic arms unless we wanted to special order expensive custom arms from a specialty manufactures and pay postage on top of it.

Now Extreme Flight is making their own Xcessories Beautiful anodized light weight aluminum arms. They are pretty light, and I am guessing they might even be lighter than the plastic arms we were using before. The holes in the arms are 2mm, so you just bolt the ball link on and forget about it. You don't have to drill anything or measure anything.
Metal arms I have tried previously were very difficult to get onto the servo because the splines were so tight, and getting them off was a problem too. The Extreme Flight arm seems to be just right in that it goes on easily with a little gentle pushing, secure the center mounting bolt, then sock it down tight as a clam using the allen cinch bolt on the side. Other arms I have had to pry off with a screwdriver, but with the Extreme Flight arm you remove the center mounting bolt, loosen the cinch bolt, and after some gentle wiggling it pops right off.

These arms fit the spline pretty well to begin with, but once you tighten the cinch bolt there is less than zero slop. It's on there, and now I worry less about the bolt that actually retains the arm falling out and the arm popping off. I think the arm would stay on without it, but I'm still going to use one!

Also useful is the arm is tapped for a 2mm bolt where the ball link is attached on, so you could probably get away with a little locktite and just crank the bolt down. I'm still the paranoid type and will use a locking nut and some medium CA on the back side, just to be dead solid sure.

These arms are going to make the entire control system much more rigid with much better control centering. Essentially, these arms are going to make the plane fly better. With the threaded bolt holes and cinch bolt, everything will be easier to set up, work on and maintain too.

I plan to retrofit all of my 60" EXPs. These are far and away the best servo arms I have ever tried, and they are really reasonably priced between $5.88 and $11.00. These arms are massive winners in every conceivable way. Xccessories' also makes these arms in larger sizes for bigger planes.
Xessories Servo Extensions
 Another one of these products you buy almost every time are servo extensions, and now Extreme Flight makes their own Xcessories Servo Extensions as well. These are really nice twisted extensions available in all the sizes you see listed on the link above. Something else that's nice is every plane's order page lists the extensions you will need, so this cuts down on the guessing.


 I got a giggle out of the packaging because it's really too nice for something like this. Usually you just rip the bag open and toss it because you want to get on to the build, but this little bag actually has a re-sealable opening at the top! You have to wonder why Extreme Flight made such nice packaging, but my guess is that this is just a part of the quality experience you get with the new line of Extreme Flight accessories.

As you can see, the leads are twisted, which looks nice. The best part is they are the right length, so I don't have a bunch of wire flapping around inside the plane and the installation looks neat and tidy, almost like I know what I am doing.


Xessories Socket Head Servo Arm Bolts
 We all hate the awful Phillips head bolts that come with servos to hold the servo arm on. The head of the screwdriver will spin inside the phillip head unless you apply a lot of downward pressure, and you can easily crack (or worse, break)  the wood behind the servo. We've also had plenty of Phillips slip off the end of the screwdriver and roll off into never-never land where they are never-never seen again.


Using an allen head greatly reduces the changes of that happening, so that's what Xcessories made for us. To secure the arm to the servo, the HS5245MG and HS7245MH  use a 2.6 X 8 mm bolt. These are available in an allen head  from Xessories as HiTec Servo Arm Screws - Bag of 10

Xessories Socket Head Servo Screws For servo Mounting
Most servos come with Phillips head screws for mounting the servos. I much prefer to use an allen head screw because the allen tool plugs deep into the screw head, and this makes installing screws much easier.

I now use Xcessories Flight's' New Socket Head Servo Screws on all my planes, and I really like them. Check the photo above of the servo arm and you can see what the servo screws look like installed. It appears they are anodized in sort of a titanium color and I like to look much better than the chrome we usually get.


These are very easy to work with because they stay on the tool really well, and not always falling off and rolling under the work bench. You can also crank them down really good because an allen is less prone to rounding off than a Phillips. These are much, much, much easier to work with and a lot less aggravation than the Phillips heads screws that come with most servos.
 I bought the big bag with 100 screws for $4.99. That's way cheaper than anything you can get from the local hobby shop. Most of the planes we fly take four servos, times four mounting screw per servo. That's 16 screws per plane, and 100 screws are enough to set up six planes with four left over if you are clumsy and drop things under the work bench.
 Five bucks to set up six planes. Try getting that kind of value at the local hobby shop.


Xcessories Pilot X
Yes, this is the same Pilot X we have always loved, only now it is under the Xcessories umbrella. This way when you purchase something of the Extreme Flight, the Xcessories tab is pretty close to your one stop page for anything but the plane and power system, and makes navigating the site a snap.


These are just a few of the items that I have personally used. Also included under the Xcessories banner are Extreme Flight's Excellent spinners and other items. Check the website for all of them.

Friday, October 27, 2017

60" Slick V2__Hell Yeah Huckin'__Flight Report


With the release of the new 60" Slick 580 V2,  the 3DHS Slick is back and better than ever. Slick pilots watched in horror as V1 Slicks sold out and were discontinued, but now the plan seems pretty obvious. The 580 V2 is the ultimate expression of the Slick and V2s in more sizes are surely coming. For Slick pilots, life is pretty good right now. I fearlessly predict that we will see a resurgence in planet wide Slick mania.

This is absolutely the coolest plane in the five foot market right now. It's so cool that this is not even close. With yards of carbon fiber reinforcement, clearly this plane is the future, and clearly the direction other companies will have to go if they want to keep up. From strictly a "cool" factor alone, nothing can touch this plane. In fact, if you want to be cool, you have to have one of these. No excuses!

If you would like to read more about the airplane itself, please check out 3DHS 60" Slick 580 V2__Hell Yeah!


Hell Yeah!
I've got to be careful to contain my enthusiasm here. I love everything that comes out of the Extreme Flight Family Of Brands, but this new Slick really surprised me. I knew I was going to like it, but after the build and initial test flight I am absolutely giddy about it. The airframe itself is so nicely done it was almost a shame to build it, though that part was so enjoyable I was already happy before I even flew the plane. It's simply a beautiful piece.


OK, first, this plane flies more in the style of the original 51" Slick than an EXP. Certainly every aspect of flight has been improved, but the Slick's original character is still there. The V2 is still very much a Slick all the way. After looking the plane over really hard and flying it reasonable hard, my best guess is that this is the original Slick concept taken to the absolute extreme. If you loved the original Slick, you can't live without this plane.


I'm not trying to establish a theme here, but my reaction after the first flight was "Hell Yeah!"  The plane took a single notch of up trim once I turned my trim sensitivity all the way down, and that's as good as it gets. From there, the plane felt so good that I just simply flew it. I had expected the same kind of learning process I went through with my 44" Slick. That took a number of flights to learn the plane and gain confidence, but there was none of that with this plane. When you fly something new or different, there is usually a lot of trepidation, and I admit to suffering some of that right up until the wheels left the ground, and then I was completely comfortable and confident. Like the 52" Slick, this one just feels so good that it's hard to believe.


This is the only 5 foot 3DHS plane I have had in about eight years, so I can't really compare it to any other 3DHS planes. All I can really do is compare it to 5 foot EXPs because I have had all of those. he Slick is slightly draggier than the EXPs I am used to flying, so it's down maybe 10 or 15mph on absolute top speed. This isn't a bad thing because the EXPs are a little bit too fast for the fields I am flying at....... a five second slow roll will usually put you out of bounds. With the Slick V2, that 10mph less gives me more time to set up and execute my maneuvers. Still, this plane is no slug. It still goes like hell, and you have to fly it responsibly, but if I were going pylon racing I would take the MXS.


Precision
First, it is absolutely crucial that you use the low rate from the manual and adjust it to your liking. Once you put a good low rate on the plane you will be amazed at how much your precision game improves. You can do precision on high rates, but nowhere near as smoothly and precisely as you can with a good low rate. Generally I use the manual rate and then dial the ailerons back to three rolls in five seconds at full speed/deflection. This is easy to keep up with for consecutive rolls, and it's also a great sport setting.

While we are at speed, the Slick's precision manners surprised me a bit. All the carbon in this plane makes it so stiff that it goes where you point it and it simply stays there. Nothing bends and nothing flexes, so it's like an arrow shot out of the sling. It just goes.  You can see my slow rolls are as good as any I have ever done. I was actually getting down there where I had having to watch out for the wall of death off the west end of the runway. That's only about 10 feet tall, and that's probably too low to be doing slow rolls on the first day with a brand new $700 plane, especially one this nice.

Point rolls were really sweet too because the Slick knife edges well. Whether this is from the nicely shaped SFGs or the huge, lift producing fuselage cross section (though it is probably both) the Slick has so much rudder authority in KE that any time I felt like I was too low I just applied more rudder and she climbed right out. This kind of authority gives you a lot of confidence, and the Slick would make a great plane to lean KE with.

With the Slick being slightly draggier there is not much speed build up in diving maneuvers. For things like Cuban eights and shark's tooth maneuvers, you simply cut the power and you have all day to line the plane up and roll it over. You can do stall turns lower because once you stall it, the plane does not accelerate like something with less drag. With the thicker wing, the plane also starts flying again sooner, so you regain control authority sooner. This also plays out really well in 3D where you do things like kill speed with a violent tumble and fly out in alpha.

In general, if I were wanting to go to an IMAC contest, I would want to take this plane. While the 60" would only be eligible for basic because of it's size, I am sure this plane in 80+ inches would mop up in the other categories.


 Snaps, spins, etc
Here is where the true character of the older Slicks makes itself known. Those were extremely gyroscopic, and none of that has been given up in this latest incarnation. Pop tops are simply beautiful and more graceful than most planes. The Slick's unique airfoil likes to stay stalled (which is what makes it so ideal for 3D), so the plane will carry the rotating momentum a little further. In fact, if you hit it really hard the Slick will spin past where you want it to come out, but after one or two of those I learned to anticipate this and a simple application of opposite rudder stops or exactly where I want it. That, or holding the rudder and applying up elevator the plane will settle into a nice flat spin, and you can either carry that around to complete the rotation, or (with enough altitude) just spin it5 around.

The last rotation looks like it is in slow motion, and right before it runs out of steam you can see it's spinning absolutely right on it's center like a top. This is hard to explain in words, but you can see it in the videos.

Upright tumbles are a bit different because the last bit is usually the plane doing one or two backflips. The 52" Slick is a lot like this, but the 60" does it much better. if you just snap the plane with all the controls at once, it will do a conventional snap roll type of tumble without the backflip. However, if you lead with the elevator by about a half a second. that last rotation will throw the tail over the nose.

Outside snaps are simply stable and noteworthy only because the plane does them so cleanly without drama. I'm still learning the timing on these because every so often I will get a half of a snap more than I was after. Like I say, it's strictly a timing thing and I've only got three flights on the plane. Don't worry though..... I plan to fly this plane hard and often, and on video too.

Final word on snaps and tumbles is that you don't need to fly in at terminal velocity to get a good One. Momentum is still important, but medium speed, timing and technique can also get you an impressive tumble, backflip or pop top.


3D
Post stall alpha flight has always been what the Slick has been most famous for and that's not going to change with this plane. The Slick remains the harrier king and you can drag it around nose high with virtually no hint of wing rock unless you get really sloppy. The Slick still makes a superb harrier trainer. With the nose way up there you can spin it around on the rudder nearly within half it's own wingspan. There are several of those in the video, so judge for yourself.

While my rollers are not my strongest maneuver, they still look acceptable with the Slick and I would have to say they are as good as with any other plane I fly. This is not a bad sign on the first day.

Part of my confidence in rollers is the Slick's great KE stability, and part of it is in the plane's floaty nature. To me earlier Slicks felt heavy, and this is probably because they like to have you carry a bit of power in 3D. I've since learned how important that is and now I lead everything with a little throttle. Still, the V2 seems to fly lighter and requires less power than the earlier Slicks. I have no explanation for this other than this is the larges Slick I have ever flown, and also probably the lightest for it's size. Either way, this Slick flies as lightly as any of my EXPs, which is pretty light.

We spent the day filming, so I never had the opportunity to dial in the CG. As a result we flew nose heavy, which works against good walls, elevator maneuvers, and parachutes. Still, there was no hint of dropping a wing or tip stall, which is a classic symptom of nose heavy. I could feel the plane was nose heavy, but this really showed up in my elevator maneuvers when the plane would not drop straight down, and moved forward slightly instead. There was still no wing rock and the plane tracked perfectly straight, so I expect this will get much better when I take the time to get the CG right.

Walls were exceptionally straight and stable, though I expect the plane will pop harder once I get her closer to neutral. In the same vein, parachutes are really straight and stable, but missing that satisfying "pop" when the plane rotates. This will also get better in subsequent flights (hopefully today) after I get the CG more correct.

Speaking of which, that's what I am going to do now...... go flying. I'm cutting this short for now  and will edit this with more observations tonight.


Finally, we generally never publish videos of a maiden. Maidens are usually just a systems check and making sure you have a good platform to start dialing in. They are almost never entertaining because you are working on a checklist of things so you know what changes you have to make. This time, though, the plane was good enough that I simply threw the program out and started enjoying it. The important part to notice is how confident I was with the plane right off the bat.

Friday, October 20, 2017

3DHS 60" Slick 580 V2__Hell Yeah!


That was pretty much everyone's reaction when the 3DHS 60" Slick 580 V2 broke cover. The V2 is definitely going to be the coolest plane of 2017, and maybe even 2018 as well. If you want to be cool, you just have to have one of these.

And that's not even the best part. The best part is the insane level of quality and performance. The coolness is just a nice bonus. Speaking strictly as an Extra man. I still think you can't have enough Slicks, so a slightly larger size than what I am used to works perfectly for me, except I still don't have enough Slicks!
While the 52" satisfies the needs of the original 51" Slick pilots, those who owned a 59" still needed something to replace their aging or crashed planes. The 60" Slick 580 V2 fills that slot brilliantly. I think you will eventually see the entire Slick lineup be reintroduced as V2s, which is a good thing for Slick fans. The 52" Slick is a marked Improvement over the 51". If you have not built a newer Slick you are in for a lot of nice surprises.

Having flown the 52" Slick since last April, I've gotten to know and love it quite well. It's been a superb airplane, so given the chance to have a 60, I jumped right in. I generally fly planes in the 48" to 60" wingspan range, so for me this plane was the missing size I needed. I also needed to have a few more 3DHS planes in the stable, so this plane was a win/win all the way around for me.

Airframe
Wow. This baby is a composite warrior. The new V2 has been given much the same carbon composite treatment that the 74" Slick 580 EXP  received...... there is extensive use of composite/lite ply laminate in the motorbox and battery tray units, plus all of the formers all the way to the tail. If that isn't enough, there are also full length carbon stringers and carbon reinforced wing tube and anti rotation pin mounts.


ALL PICTURES CLICK TO ENLARGE

 
Carbon/ply laminate formers run all the way to the tail. You can also see the bottom sheeting is reinforced with carbon stringers, as well as the turtle deck sides. The top of the fuselage all the way to the turtle deck is also composite/ply laminate. I think we have all broken those top rails once or twice changing out the battery, so it's nice that's so tough on this plane.

The wing tube mountings are carbon reinforced, as are the anti rotation pain mounts. These are high stress areas and reinforcement here makes for a stiffer, longer lasting plane. Also, the rudder tray is not only built with plenty of beef, it's carbon reinforced on top of it. You can also see the precut cooling air exits, carbon stringers and preinstalled air baffle that is just behind the cooling slots. 3DHS went to a lot of effort to make the model as nearly finished as possible.
 Motorbox top, sides and bottom and firewall face are reinforced with  carbon/ply laminate. I don't imagine they will be selling many motorbox kits for this plane because to break the motorbox you would probably have to completely shred the airplane. On the bottom, carbon longerons reinforce the bottom, and this makes a nice place to mount the ESC )more on that later).
The canopy frame is also carbon/ply reinforced. Notice the G10 composite material pointed out by the arrow. That's the area that always seems to get broken from repeatedly hitting it on the plane when closing the canopy, or the first area to hit the ground when you drop it. This has been reinforced from the beginning n the EXPs, but it's worth pointing out here because it's just more of the total package thinking that went into this plane, Also note the front of the canopy frame is carbon/ply reinforced. This is not normally considered a high stress area, but the carbon fits the theme of the entire plane really well. It's like, that would be the only thing on the plane not covered, so you gotta put some on there.
 
Another nice surprise is the carbon on the wingtips, stab tips, and top of the fin. I believe this is simply some sort of covering, but it still looks really nice.
Another nice surprise is the guide tubes for the pull cables. This allows for the cable to exit through a small, less visually intrusive hole instead of a large slot like we have had for years. It's also one less thing the builder has to do since it's ready to use.
While Slicks art generally known for their superb harrier and post stall manners without using SFGs, the V2 comes with the choice of conventional SFGs and the 3DHS pioneered "hatchet" style SFGs. These are nicely finished with the big X already applied. Usually I have custom decals made for my SFGs, so it's nice to have saved the expense on this plane.
Also carbon, as is becoming the norm with Big X planes in this size, is 3DHS' carbon tube supported, carbon laminated landing gear block assembly. I have extensively tortured this system in my SHPs and 48" Demonstrators, and they have been golden. I believe you would just about have to destroy the entire plane to pull the block out. Certainly in a really huge hit you can kill the landing gear legs, but they are designed that way so as to save the plane. It's a lot easier to bolt on a replacement gear leg than to rebuild the whole undercarriage.
Man, there is so much to cover on this plane I did not know where to start and it seems like it's never going to end. Finally, I think, the wing bags now feature a nice little pocket for the SFGs. I'm sure there are a few things I missed, and will update a little later.

While you might think Chris and Ben simply went crazy trying to see how much cool composite material they could pack into the plane, every single bit of it is extremely functional reinforcement. It would take too long to list all the composite laminated pieces, but one look at the plane and you can see for yourself. Not only does this make for a stronger, stiffer, better flying and longer lasting airframe, but it also looks so hi tech cool that it's really fun to show off to your friends at the field.

We have seen this sort of composite laminate over lite ply construction before, but never done as well as Big X factory has with this plane.

Having put thousands of flights on Demonstrators that are constructed this way, I can assure you that this construction is purely functional and only looks cool as a side effect. You are not paying for bling that doesn't do anything. You are paying for functional material that also looks great.

New for the V2 is 3DHS and Extreme Flight's exclusive self jigging horizontal stabilizer. I have built three of the 52" Slicks that use this construction and they were all perfectly straight. I have so much faith in how this guarantees a straight assembly that I did not even measure the last stabilizer installation until after I had glued it in.....and it was perfect.

Assembly on this one is a little different from the Extreme Flight 52" Slick in that you install the elevator halves separately from each other, but if you have built a 3DHS plane or two you probably won't even need to look at the manual (though I certainly don't recommend that approach). The only important part of the assembly remains the same on the 60" Slick: you merely have to get the stab shoved all the way forward and it self aligns. Jam it in there, glue it, and you're done. About all you can get wrong is spilling glue on the plane, but if you have a bottle of Golden West Super Solvent on the bench even that's not much of a worry.

Construction in general is getting to be so similar between Extreme Flight and 3DHS that it is hard to tell them apart any more. This is actually a really good thing because only one way can be perfect, and I think we are getting closer and closer to that. There are still little differences, but I believe those are becoming fewer and fewer.

Hardware
It's also nice that Ben and Chris have worked hard to standardize the hardware between 3DHS and Extreme Flight. I am now always working with hardware I am familiar with and trust, and it's also the best hardware you can get your hands on anyway. The V2 uses the same ball links as the 48" and 52" EXPs, and the same Xcessories tailwheel assembly I like so much. All the bolts are the same size as what I am used to using, so I don't have to search around for the right allen tool. I already know what tool to use because I am so familiar with all the hardware. While this might seem like a small thing, it adds up in making the build go smoothly.

Speaking of hardware, the V2 comes with Xcessories' titanium anodized cowling screws. I just love these things because I am not always losing the washer and they are allen head instead of cheesy phillips head. They also use the same allen tool as Xcessories servo screws, and the allen bolt that Extreme Flight sells to hold the servo arms on. Essentially, you can preflight the entire outside of the plane with one single allen too. They are very functional and look great too. Titanium rocks!

Power System
No doubt this was always going to be Extreme Flight's Xpwr Torque 4016/500 Mk II motor and Airboss 80 Elite ESC. We have been using these exclusively on all of our 60" EXPs since the dawn of time and they have always had blistering power and rock solid reliability.


Of course the speed controller on any of my planes is always going to be an Airboss, for this project, the Airboss 80 Elite. I've been using these ESCs in my larger planes since the dark ages and still have not had one let me down. Never change what's working. Again, with this being a completely integrated package, the motor and ESC work together perfectly. Even on fully charged 70C packs there was never a hint of squeal or hesitation, and throttle response is smooth and linear. This is what I expected from the Airboss ESC and what I've become accustomed to with Torque motors. Xpwr certainly got everything absolutely right on this package.

The Airboss 80 already comes with a deans plug installed, so, the hardest part of using the smoothest running, most powerful and reliable power system available is to simply plug and play.
The bottom of the motorbox makes a nice, convenient place to mount the ESC. All the wires shoot straight back and the deans plug comes out where it is easy to get to. I used a balsa block to lift the ESC up a little go I could slide it back over the former. This give you more wire to work with when plugging in the pack, and also moves the CG back a little.

Servos
Recommended for the Slick are Hitec's awesome HS7245MH servo. These are fast, powerful servos that center extremely well. You can run them on voltages from 7.4 to 8.2 volts with no hint of stalling or blowback. Centering is also so locked in that once you trim the plane the first time, that's probably it for the life of the airframe. Centering does not drift off or change, and that means you will have a plane that stays trimmed and flies better.

Yet again, I am not much of a spec kind of guy and this is not a tech blog. Still, I know a lot of you really do want all the specs, so here they are:

HS-7245MH Servo Specifications
Performance Specifications
Operating Voltage Range (Volts DC) 6.0V ~ 7.4V
Speed (Second @ 60°) 0.13 ~ 0.11
Maximum Torque Range oz. / in. 72 ~ 89
Maximum Torque Range kg. / cm. 5.2 ~ 6.4
Current Draw at Idle 12 mA
No Load Operating Current Draw 190 mA
Stall Current Draw 1,600 mA
Dead Band Width 2 µs
Physical Specifications
Dimensions (Inches) 1.28 x 0.66 x 1.29 \
Dimensions (Metric) 32.4 x 16.8 x 32.8
Weight (Ounces) 1.20
Weight (Gram) 34.0
Circuit Type G2.5 Programable Digital
Motor Type Coreless Metal Brush
Gear Material Metal
Bearing Type Dual Ball Bearing
Output Shaft (type / Ømm) Standard 24
Case Material Plastic
Dust / Water Resistance N / A
Connector Gauge (AWG) / Strand Count 22 / 60
These are extremely robust and reliable servos, and the benchmark for 60" electric 3DXA planes.

This time all my HS7245MH were in flying planes, and I am loathe to pull apart something that is working and sorted. Like it seems with all my current projects, cash was short, but again, Hitec rescued me with a set of shiny new HS7245MH. Again, thanks to my friends at Hitec for hooking me up with these great servos and helping make this article possible. Also thanks to my friends in the Hitec service department who do such good work on the stuff I occasionally tear up.

Batteries
My current packs are Thunder Power 6s 3300 Lightning 55C and they have been exceptional batteries. They are a bit over two years old and have been run hard and often, so it's not surprise they are a little tired. What's surprising is how long that took. They still have plenty of pop, but I am coming down with less and less voltage. I have found when the capacity starts to fall off that's a good time to start scoping out new packs.


I wanted something as similar as I could get to my Lightning packs, so I went with their replacement in the lineup, the new Thunder Power Elite 55C. 6s 3300This is the size pack I have found works best in these planes, being relatively light and still giving a reasonable amount of run time.

The 55C series has always been reasonably priced, and since switching to these I have not felt like I have given up any performance to the 70C packs I used to run. The only difference I could see was that I didn't have to spend as much money.

Set Up
As is becoming de rigeur for all my builds, I make extensive use of Xcessories' brand accessories. You can order your Slick with absolutely everything you will need, from the beautiful Extreme Flight anodized aluminum servo arms, the correct length Extreme Flight servo extensions and even the Extreme Flight anodized titanium colored socket head screws for installing your servos. As long as you have a receiver, you can order everything you need directly from Extreme Flight, get it all in one package and only pay the postage on one box.


Ailerons
Again I used my custom Xcessories 1.24" arm with 2mm holes drilled at 7/8": from center. This ends up being the same thing as a Hitec PN55709 arm. With the end points cranked, I am getting about 32-34 degrees of throw, which is what I like personally.


Elevator

Like always, I go for all the elevator I can steal and this time is no different. With the 1.25" Xcessories arm and end points cranked, I am at about 70 degrees of up elevator. I may move the ball link to the second hole because this is simply an insane amount of throw. I'm getting about 80 degrees!


Rudder
I ordered my Slick with the recommended Xcessories servo arm package. Included was a really sweet double arm for the rudder servo. It might seem like a small thing, but the red arm looks really great surrounded by all that carbon fiber in the radio compartment.

Flying
This article is getting a little long, like they all seem to, and people want the information now. We will come back as soon as we can and post some video, but the weather is looking a little dicey so it may be a day or two. We will have it as fast as we can.
Hell Yeah!