
Undoubtedly our most popular project has been the Sport Flying The EXTREME FLIGHT Extra EXP and set up. That plane allowed regular sport pilots to experience a high quality, high performance 3D machine in a format they were comfortable flying, with the opportunity to later move into 3D if they chose. Some people were happy just sport and precision flying the Extra, but most of my students later wanted to move into Extreme Aerobatics, probably because I was such a bad influence on them.
By their very nature, 3D planes make excellent sport flyers. They are light weight and usually superbly designed. In the last few years most 3D planes have been really strengthened in the landing gear area, which is also a great idea for a durable sport plane. Since 3D planes have to go back and forth from flying airspeed to post stall flying, they have to have an extremely docile stall characteristic, again, a feature that marks a great sport design. The trick with any set up is tailoring it to match the performance characteristics you are after, and when making a 3D plane into a sport flyer, it's just a matter of getting the throws right and moving the CG forward a bit.
The Laser EXP Sport
By friend Barry volunteered his new Laser for this project. Barry had previously flown an Edge EXP with sport set up, but got it into the SPARKS coffin corner of death toward the west at sunset. The plane greyed out and that was it. Since the mechanical set up for these planes is all the same, we used the servo arms and ball links straight from the wrecked Edge, and I will detail that out later.
Something we did differently this time is use the fiberglass wingtips from the 48" MXS. They match the Laser's blue covering perfectly and look perfect. The tips have the effect of making the plane a little more docile and locked in. This is perfect for sport flying. The main reason we used the tips is because they look so cool, and also to show the MXS doesn't need SFGs to perform beautiful sport and precision flying. You can get these from the 48" MXS parts page.
Also on board is the trusty pilot from my beata Yak. He has been such good luck for that plane that I wanted to pass him on, and he really jazzes up the way this plane look.
Click To Enlarge


There has been a little confusion about the set up, though. Some people were trying to put that set up on 60" planes, and planes from other brands. Since each airframe design is different, this is not always going to work out. In this article, I am going to lay out how you develop a sport set up for any plane, whether it be Extreme Flight in any size, or even a different brand.
While we have not tried this set up on every one of the EXPs. so far it has worked on the Extra, Edge, Yak, and laser. I have every confidence it would work on an MXS too.
How To Develop A set Up
The hard way is to set the ailerons up for three rolls in five seconds at full deflection. Set the elevator up so that at full deflection you can do a full throttle loop without the plane trying to snap or veer out. That is usually perfect for most sport maneuvers and most general sport flying. It's enough to do snaps and spins while remaining easy to fly, but not enough throw to do any 3D. It's perfect for basic aerobatics and precision flying.
The problem with developing a set up like that is that it involves a lot of trial and error, something you don't especially want to do with a brand new plane. You will be adjusting linkages and programming the radio when you could be just flying the plane.
An easier way to get to this set up is to begin with what's in the manual. Most elite 3D airframe manufacturers go to great pains to get their low rate set up just right for precision, which is also very close to a good sport set up. All you do is take the low rate from the manual and use it as your high rate. On an Extreme Flight plane this is just a little too fast (for me) on the ailerons, so for that I use a low rate that gives me three rolls in five seconds at full deflection. This is a very comfortable roll rate that sport pilots can keep up with. From there, move the CG about 1/4" ahead of what's in the manual and you will have a very docile but capable sport machine.

By beginning with the low rate from the manual you only need a few adjustments to turn any good 3D plane into a nice sport/precision aerobat. I am sure there are some out there that have messed up low rates, but if you start with a plane from one of the top three or four reputable companies, you can't go wrong.
I have owned and set up a lot of 3D style planes, and on almost all of them the low rate is perfect (with a few revisions) for sport/precision. This is where I got the idea to tame the plane down for some of my basic students, or pilots ready to progress into aerobatics.
Developing a set up this way is not always going to work because not only is any set up subjective, but like I say, some manufacturers might not have a good low rate set up in their manual. Partially because of this, your best bet is always going to be to buy (preferably) Extreme Flight, or one of the other elite manufacturers. Certainly you can get some good bargains out there, but nothing is going to be as refined and pre-sorted out like and Extreme Flight plane.


The Laser Sport Set Up
While many sport pilots have been introduced to 3D style planes by the Extra EXP, I felt it was time to give them a snazzy alternative that will fly just as well. When I had a chance to set a Laser up for sport and get a test flight on it, that was too good of an opportunity to pass up.
The Laser is also an ideal sport plane. It is smooth and solid to fly, and mist guys who can handle a T28 can move into a Laser with just about no trouble at all. With today's AX3X and other stability systems, this can be made even easier. I wish I had more experience with those systems, but I plan to try a few this year. I have flown a couple friend's planes using these, and was very impressed.
Before you do any set up changes, you need to know what you are wanting from the airplane. What we are after here is very simple..... we want it to be easy to fly, stable, and forgiving, yet still capable of doing all conventional aerobatics. Most of that is already designed in to the plane with the long tail moment, big stabilizers, light weight, etc. The Laser EXP is already a very stable plane, but we are just going to dial even more of that in with the set up.
Remember also that set up is a personal thing and you may want to change yours around to suit your style and tastes better. You may also want to add more control throw as you progress and improve. That's fine too. Nothing is written in stone. We are just trying to give you a good place to start with a smooth, stable and easy to fly plane.
This is simply a baseline set up. Start with this, fly it, adjust as necessary. It turns out this is so close to my idea of perfect (for sport and precision) that we didn't really have to do much, and you may not either.
Remember that this is not carved into stone. The set up will be a few degrees different from one EXP to the next, because the airframes are different and have different characteristics. However, if you use this set up on any 48" EXP, I have every confidence you will be within a degree or two of perfect.
Remember that this is not carved into stone. The set up will be a few degrees different from one EXP to the next, because the airframes are different and have different characteristics. However, if you use this set up on any 48" EXP, I have every confidence you will be within a degree or two of perfect.
Laser EXP SPORT SET UP
Elevator: Both Rates-15 degrees, Expo: 35%
Aileron: High rate-14- degrees, Low Rate 11 degrees, Expo: 35%
Rudder: Both rates, all you can steal, Expo: 75%

Those are the measurements for the setup, but if you follow the steps I outline next, you will get very, very close to that.
Step One: Clear Programming
First, start with a clean program on your transmitter. Don't copy an old one. Format or clear a program so you start from scratch. We don't want to have to deal with any left over mixes or chase any other digital ghosts from the last plane.
Set all of your high rates at 100%, and the same with your end point controls. It is crucial you do this now so we get the right amount of throw and maximum mechanical advantage from the servos. I like to use the end point controls for fine tuning and make the major set up adjustments mechanically. Also, by starting at 100% end points, you have the capacity to add throw electronically as you become more comfortable with the plane and demand more performance.
Rates
For some this might be disappointing, but the high and low rates are very nearly the same, with the exception that, once again, the low aileron is set for three in five. I run 35% expo ailerons and elevator (on both rates), and 75% on the rudder (on both rates).
Generally I put students into one of these planes so as soon as they can handle to T28 with good confidence. Since these are newer flyers, I prefer they spend more time learning to fly and less time flipping switches. If you are going to be flipping rate switches all the time you'de be better off putting a 3D high rate and a low rate on it
Mechanical Set Up
No surprise is that we started with the same set up as Barry's Edge EXP. This way we did not need to set up the ball links on the servo arms and the throws would be right. We just used what we had before.
Make sure your ball links operate smoothly with no drag. Sometimes if you over tighten the mounting bolts the ball link will tighten up. You can loosen the ball link by popping the brass ball in and out a few times. When bolting the ball link to the control horn, get that as tight as tight as you can without introducing any bind, You don't want anything loose either.
I like to use a Dubro 2 X 12mm hardened allen bolt with a 2mm lock nut. On top of that I jam nut a regular 2mm hex nut. That alone will assure everything stays together, but then I put some medium CA on the exposed threads and that assembly should survive even a nuclear holocaust.
Ailerons
Here we used the inner hole of the standard Hitec HS65MG double servo arm. It does not look like it would give you much throw, but it is more than enough for sport flying.
Click To Enlarge

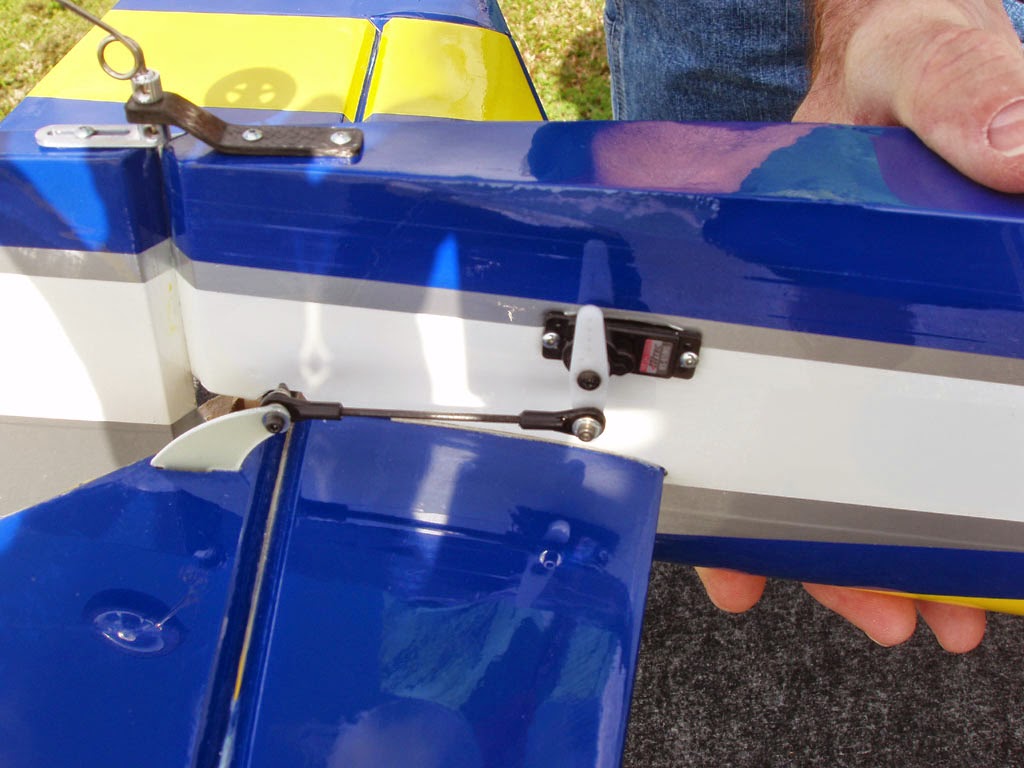
Elevator
The inner hole of the single arm was still a little too much throw, so we just use the inner on the hole double arm that comes with the servo. The spacing on the holes is in between the holes on the single arm, so in essence it gives you a half of a hole less throw.
Click To Enlarge
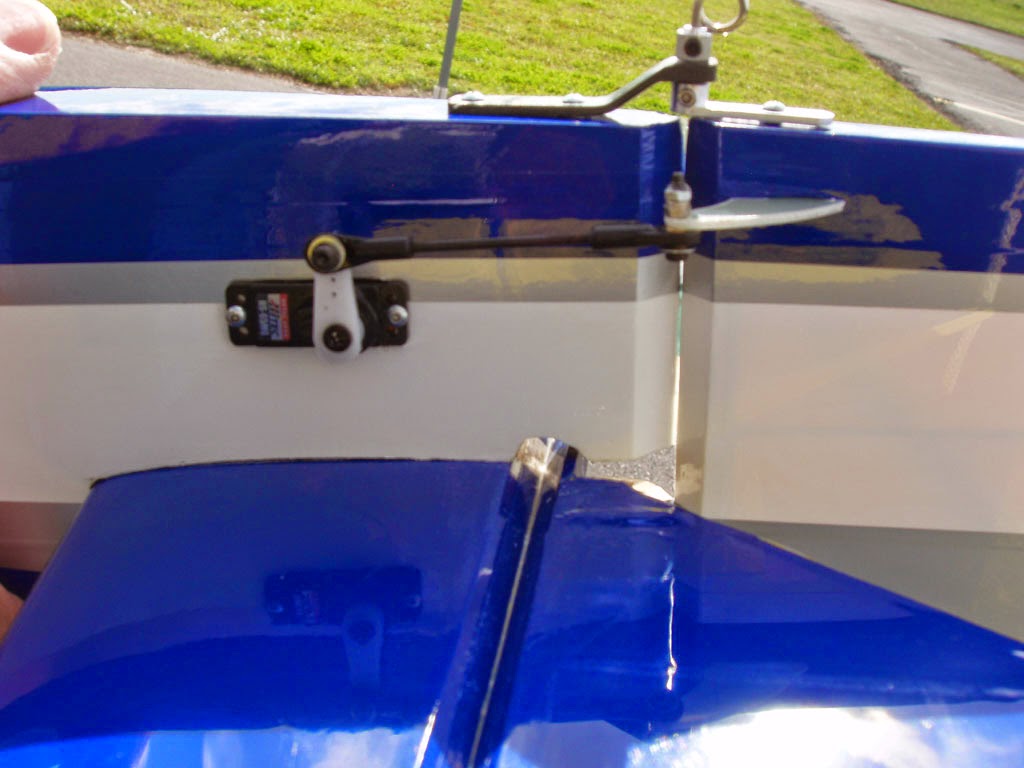
Rudder
This is again the double arm, which is not enough throw, so you crank up the end points on your radio.
Click To Enlarge
CG
For sport flying I like the planes to be a little more nose heavy. For one thing you do not need it to be so on edge for sport flying. On the other hand, you don't want it to be so nose heavy that it files like a pig. I generally like to move the CG about 1/4" forward from what the manual calls for. That makes the plane a little more docile, and helps it track better at higher speeds that you maintain for sport flying.
FLYING
Start off on the low rate and try that until you have the plane trimmer and have felt it out a little. The high rate is only a little more, and on the ailerons only. Best bet is to adjust the low ailerons to where you are most comfortable, but with this set up most people are very, very comfortable.
Enjoy sport flying the Laser EXP, and please tell your friends about this article.


