
As you may have read in Weird For Extras__Passion Meets Pragmatism , I am a bit weird for Extras. In fact, it got so weird that I was binge flying my 48" Extra EXPs and my other planes were not getting much love. As long as I had one of those around, it was always the first plane I would think of when it came time to choose what to fly.
So, I needed a little bit of a change and that opportunity presented itself when I wore one out and gave it to a friend, and then I crashed the other one. Just so I could spend more time with my other planes I put off building another Extra, and it has been a little over a year since I last had one. It was good to miss them for a little bit, and now I can't wait to get started with them again.
The build and test flights went perfectly as expected and almost right away it had been like I had been flying the plane all along. It was like taking a long trip, then pulling into the driveway and everything is normal again because you are home.
You can scan the blog for other Extra articles because I have covered about everything I can on this plane. For this article I am going to run through a few steps in the build process and get a lot of pictures. We have a lot of newer pilots discovering this plane so they need a good resource for setting theirs up.
Extra In High Voltage
I've recently built a red Extra EXP with Hitec's HS5070MH and HS5087MH (on the elevator) servos, running on 7.4 colts from a Castle 10 amp BEC. Control response is insane and with the
improved servo centering the Extra tracks like a laser beam. It just flies solid. I have often compared the Extra's high speed manners to Hano Prettner's world beating Curare, and this is even more fitting than ever before.
I spent most of 2015 flying these servos every day in my yellow 48" Laser and I eventually lost track of how many flights I had on them, but it was probably around 300 or better. They always performed beautifully and I never had a minute's worry with them. I eventually crashed that plane pretty badly and sent the servos over for a good cleaning and check out. Hitec was kind enough to simply replace them with new servos, which gives me a great feeling building my replacement Laser with all new equipment.
Below was the third flight (and the first in good conditions) on the new red Extra I built about two weeks ago. I am already flying it with the confidence I had in my other Extra EXPs. I'de like to think I have Improved my flying since I last flew one of these, and hopefully I can now fly the Extra even better.
Click To Enlarge

This is in keeping with the Extra's strongest trait, it's balance. It flies as good as it looks. The Extra does super locked in precision, and also does really righteous 3d. On low rates it's a better sport plane than any dedicated sport plane I have ever flown, so the Extra is adaptable, flexible, and certainly capable.
At least in my mind, everything the Extra does is the way it is supposed to be done. It is smooth and predictable and it is hard to do anything with this plane that does not look graceful.
Click To Enlarge


Using the MXS Wingtips
For the red Extra I painted up a set of MSX racing wingtips. I shot rthem with Krylon white and applied 3M high peformance silver vinyl. This vinyl is really easy to work with and looks great. I used a set of these most of last year on a 48" Laser, and a few years ago on another Extra. You can read about how the tips affect performance in Flying The Extra EXP With MXS Wingtips


Extra EXP With Standard Servos
With the red built and sorted all that was left to do was build a blue. I like flying the red because it is easy to see and screams for attention, though the blue is certainly the prettiest. My first Extra EXP was blue and I have a lot of incredible memories from that plane.
Click To Enlarge


The new blue Extra is equipped with the standard equipment recommended in the manual. I use Hitec HS65MHs on the ailerons and rudder, though I deviate from the manual on the elevator and use the robust HS85MG for the elevator. As always, I use the Torque/Airboss power combo, and like the rest of my planes with 6 volt servos, I use the Airboss' excellent built in BEC to feed the servos.
This plane is identical to all the Extra EXPs I have been flying for the last five years (with the exception of the new red one). This set up has worked extremely well and given me remarkable reliability and performance.
While the response is not quite the same as my red Extra with 7.4 volt servos, the plane is still nearly as capable in anything except terminal velocity snaps and tumbles. The Extra is not really that kind of plane anyway, so the standard servos are still more than good enough unless you simply want to abuse the plane and try to pull it apart.


This will probably be my primary plane for 2016, which means it will be flown often and utterly remorselessly. After three flights I have a pretty good accord going with it, though I need some slightly calmer conditions to get the final trim dialed in dead on. It's still close enough for me to fly it hard, but with my trim adjustments turned all the way down I need one ot two good high speed passes in calmer conditions to hit perfection.


Tne original plan was for the blue extra to be a Christmas present to myself, but once the kit got here i just couldn't wait. I tore into it and flew it the next day
Extra EXP__Couldn't Wait For Christmas II from Doc Austin on Vimeo.
The Build
Details
It helps to be able to set up as many details as possible before the plane gets here. Once I get into the build process, I am in the zone, and hate to stop for piddly little tasks like ball links or grinding flat spots on the tailwheel wire. I like to take care of that kind of stuff before hand so I can concentrate on getting tail on straight and the hinges right.
As such, I like to pre-cut and fold all of my control surface sealing material (clear Ultrakote), assemble the pushrods and ball links, set up the tailwheel assembly, and even set up a landing gear with wheels and wheel pants if I have enough parts. The more little things I can get done ahead of time, the more I can concentrate on getting the plane straight and the easier it is to do a nice, smooth build.
Ball Link Set Up
I have done so many of these that I know in advance exactly what I have to do. I have also acquired a nice spare parts inventory and have the luxury to set up the servo arms and pushrods ahead of time. This saves me a lot of work because it takes time to get the ball links operating smoothly with no drag.
The ball links are usually a little tight, which you don't want. You don't want sloppy either, but that is almost never a problem. You don't want any drag in the ball link because that can give you poor centering, so I like to loosen them up a little.
The first thing I do is thread the ball link on to a pushrod. This makes it easier to hold on to, especially if you have arthritis. I use a small electric drill to spin the pushrod into the ball link, but you have to be careful you don't thread it in so deep that you damage the link. I use the clutch on the drill to keep this from happening. On these EXPs the threads usually go almost all the way in, and that way there is no chance they will ever pull out. I try to get it as close to bottomed out as I can. Once you get it in that deep, it is loathe to turn back out, so I use that end to bolt to the control horn, and make my trim adjustments by spinning the servo arm at the other end of the pushrod.


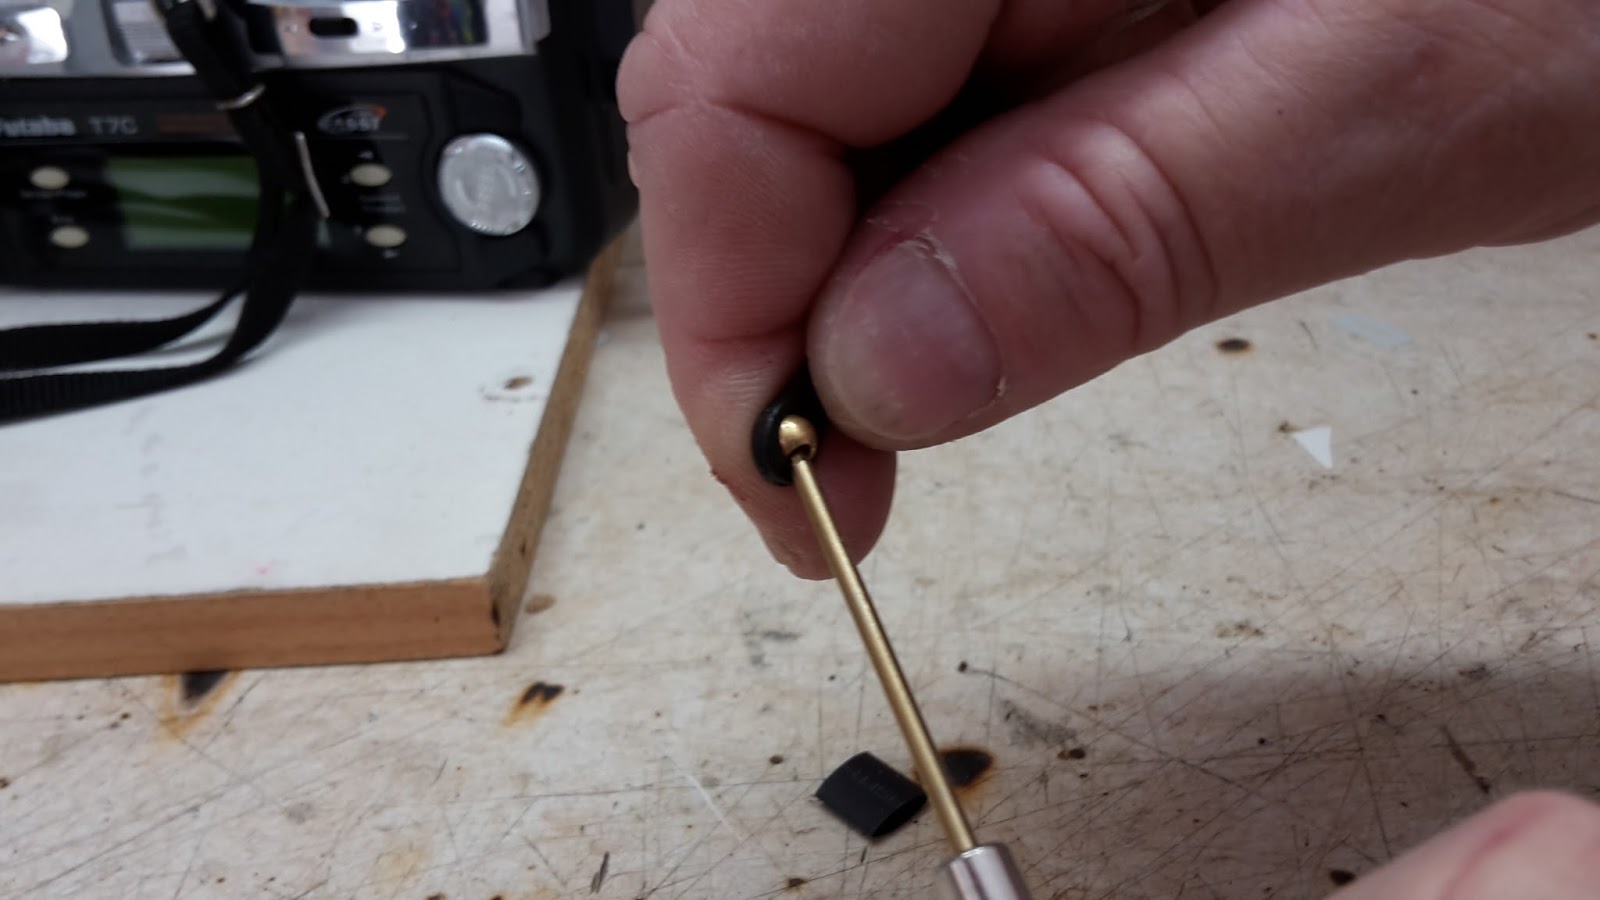
Then, I use an allen driver to pry the brass ball out of the plastic link itself. I pop the ball in and out a few times until it is nice and smooth, and can move around with no drag.
Pop the ball out as such....


Pop the ball out as such....
And pop it back in thusly...

Sometimes after you bolt it on to the servo arm or control horn the ball link will tighten back up, so you have to pull it apart and start over. Generally you want the bolt securing the ball link as tight as you can get it, but that can introduce drag into the ball link. This is why you have to tinker with it a bit. That's when you have to take it apart and start over.
For securing the ball links I depart from the hardware pack a little bit. I like to use Dubro 2mm X 12mm case hardened allen bolts. It is always easier to work with an allen driver than a screwdriver, and I've got a really nice set of Losi tools for this. I also like to use an aircraft locking nut, and then a regular hex nut on top of that and jam nut the two together. Once that is done, I apply the coup de grâce in the form of a drop of medium CA to the exposed threads. Like this, the assembly can never come apart on it's own, but by spinning the nut off it will shatter the CA and you can take the assembly apart from there.
This is the control horn on my Laser, but the double nutting technique is the same.

All of this requires a lot of tinkering, but it pays big dividends to have smoothly operating, drag free pushrod systems. The servos work better and center better, and the aircraft flies more smoothly and precisely. Little details like this make a big difference in flight performance.
Tailwheel Assembly
I really like the EXP tailwheel assemblies. They also require a little bit of tinkering, but if you set one up properly they work brilliantly. No tailwheel assembly is going to stand up to repeated harrier landings, especially since a lot of times the plane simply stalls and drops the entire weight of the airplane onto the tailwheel. Still, I get away with it all the time because I took the time to set it up right the first time. I will bend the wire every so often, but we have a vise at the field, so it's no problem to chuck it up and bend it back.
Also remember that I do things like snap roll into a landing, do donuts and other such silliness, so I might be harder on the unit than a lot of people.
I also like that you can change the entire unit out in about 30 seconds by removing three screws. If you have a problem it's easy enough to fix right there.
The most important part of the process is grinding flat sports on the tailwheel wire where the steering arm and wheel collar grub nuts will sit. A flat spot gives those a larger surface to sit on, and less chance the arm can turn on the wire. You can either file it flat or hit it with a big Dremel grinding disc (my preferred method)..

Earlier steering arms were two pieces press fit together, but the newest arms are now threaded. I make sure the arm is threaded tightly onto the round center piece, then use a T pin to apply a drop of thin CA as shown in the photo below. It helps to tilt the arm up a little so the CA can wick into the joint. Also, remove the grub screw so in the case you get too much CA in there none of it glues that in! You only need a drop.

Finally, you have to get the center of the wire directly over the hingeline. If the wire and hingeline are not on the same axis, you can get binding, so it pays big dividends to take your time here. If you get it right you can tighten the screw that holds the arm to the rudder down tightly. Check rudder movement with the tailwheel assembly installed and hooked up to the rudder. If movement is good with no binding, you got it right.

It's hard to get it absolutely dead on, but if you are only off a little you can leave the screw that mounts the arm to the rudder a little loose. It also helps a little to open the slot in the arm a little so the screw can slide a little easier.
 Here you can see I have the tailwheel wire centered over the rudder hinge line, and that makes it operate with no binding.

The EXP tailwheel assembly works beautifully, but you do need to take a little extra time to get it working smoothly. I can set one up from package to finished in about five to ten minutes, and that's just puttering around with it and not trying to rush. If anything, it pays off if you don't rush and take the time to set it up right in one try. It is hard not to want to blast the project out and go fly it, so it takes patience to slow down and get all the details right. If you do, though, you get a plane that operates properly and smoothly. It's better to take the time in the shop and do it right than to have to fix something at the field.
ESC Installation
From years of flying nitro slimers I got into the habit of mounting my radio switch on the opposite side of the exhaust. Most of the time this put the switch on the left side of the plane. I carried this old habit over into electrics, and as a result have always mounted the ESC on the left side of the motorbox.

The newer Airboss ESCs have longer wires to the switch, which makes installation more flexible. To get the weight more centrally located, I mounted the ESC on the bottom of the motorbox. I relieved the lip on the bulkhead just a little so I could slide the ESC back a little further and get the deans connector in an easier position to access. Like this, the ESC sits dead in front of the cooling opening in the front of the cowling under the spinner.
Previously, when on the side of the motorbox, the ESC was only getting hot air off the motor, but now tucked under the motorbox it sits in fresh, cool airflow. Cooling has never been a problem with either the torque 2814 or Airboss 45 ESC, but heat is always the enemy and the more of that you can dissipate with cooling the better and smoother everything is going to run.
Also worth noting is this is how it is shown in the manual and previously I was just being stubborn and stuck in my own ways.
Cooling Baffles
Again, even without the included cooling baffles the Torque and Airboss always runs cool, especially in the Extra with it's large cooling nostrils. Still, cooler is better, and with the ESC now out of the way, I can run both baffles on the motorbox sides. These channel cooling air right to the back of the motor where it generates the most heat. More airflow over this area will cool the entire package down.


We hope to be shooting and adding new Extra EXP video all week. December 2nd is usually the most beautiful flying day of the year in Florida, and it's Nov 28th now. I definitely plan to take advantage of the cool weather and calm skies and it will be nice to have two new Extra EXPs for that.
Since we are a little short on video right now, this is from last year with my older red Extra. The weather was simply horrid, and we had to shoot in unpredictable conditions. Thunder storms would roll in and out and as you can imagine that made the wind come and go. The worst part is always the wind gusts, which in Florida can be 10-20 mph higher than the prevailing wind. The gusts can also change direction with no warning, so you have to be on your toes and have an agile, forgiving aircraft. For me, nothing is better under those conditions than the Extra EXP.
It was tough conditions, but we had a nice HD video camera and plenty of memory, so you don't want to waste that kind of opportunity. My friend Mark was also in town for the day and we tend to encourage bad behavior in each other when it comes to flying. What could go wrong?
Fortunately, this time nothing did go wrong and we came away with a lot of useful footage. This is probably my best Extra video to date. We are hoping to shoot video of the blue Extra in the next few days, so stray tuned.

Earlier steering arms were two pieces press fit together, but the newest arms are now threaded. I make sure the arm is threaded tightly onto the round center piece, then use a T pin to apply a drop of thin CA as shown in the photo below. It helps to tilt the arm up a little so the CA can wick into the joint. Also, remove the grub screw so in the case you get too much CA in there none of it glues that in! You only need a drop.

Finally, you have to get the center of the wire directly over the hingeline. If the wire and hingeline are not on the same axis, you can get binding, so it pays big dividends to take your time here. If you get it right you can tighten the screw that holds the arm to the rudder down tightly. Check rudder movement with the tailwheel assembly installed and hooked up to the rudder. If movement is good with no binding, you got it right.

It's hard to get it absolutely dead on, but if you are only off a little you can leave the screw that mounts the arm to the rudder a little loose. It also helps a little to open the slot in the arm a little so the screw can slide a little easier.


The EXP tailwheel assembly works beautifully, but you do need to take a little extra time to get it working smoothly. I can set one up from package to finished in about five to ten minutes, and that's just puttering around with it and not trying to rush. If anything, it pays off if you don't rush and take the time to set it up right in one try. It is hard not to want to blast the project out and go fly it, so it takes patience to slow down and get all the details right. If you do, though, you get a plane that operates properly and smoothly. It's better to take the time in the shop and do it right than to have to fix something at the field.
ESC Installation
From years of flying nitro slimers I got into the habit of mounting my radio switch on the opposite side of the exhaust. Most of the time this put the switch on the left side of the plane. I carried this old habit over into electrics, and as a result have always mounted the ESC on the left side of the motorbox.

The newer Airboss ESCs have longer wires to the switch, which makes installation more flexible. To get the weight more centrally located, I mounted the ESC on the bottom of the motorbox. I relieved the lip on the bulkhead just a little so I could slide the ESC back a little further and get the deans connector in an easier position to access. Like this, the ESC sits dead in front of the cooling opening in the front of the cowling under the spinner.
Previously, when on the side of the motorbox, the ESC was only getting hot air off the motor, but now tucked under the motorbox it sits in fresh, cool airflow. Cooling has never been a problem with either the torque 2814 or Airboss 45 ESC, but heat is always the enemy and the more of that you can dissipate with cooling the better and smoother everything is going to run.
Also worth noting is this is how it is shown in the manual and previously I was just being stubborn and stuck in my own ways.
Cooling Baffles
Again, even without the included cooling baffles the Torque and Airboss always runs cool, especially in the Extra with it's large cooling nostrils. Still, cooler is better, and with the ESC now out of the way, I can run both baffles on the motorbox sides. These channel cooling air right to the back of the motor where it generates the most heat. More airflow over this area will cool the entire package down.

Flying

We hope to be shooting and adding new Extra EXP video all week. December 2nd is usually the most beautiful flying day of the year in Florida, and it's Nov 28th now. I definitely plan to take advantage of the cool weather and calm skies and it will be nice to have two new Extra EXPs for that.
Since we are a little short on video right now, this is from last year with my older red Extra. The weather was simply horrid, and we had to shoot in unpredictable conditions. Thunder storms would roll in and out and as you can imagine that made the wind come and go. The worst part is always the wind gusts, which in Florida can be 10-20 mph higher than the prevailing wind. The gusts can also change direction with no warning, so you have to be on your toes and have an agile, forgiving aircraft. For me, nothing is better under those conditions than the Extra EXP.
It was tough conditions, but we had a nice HD video camera and plenty of memory, so you don't want to waste that kind of opportunity. My friend Mark was also in town for the day and we tend to encourage bad behavior in each other when it comes to flying. What could go wrong?
Fortunately, this time nothing did go wrong and we came away with a lot of useful footage. This is probably my best Extra video to date. We are hoping to shoot video of the blue Extra in the next few days, so stray tuned.
Extra EXP EPIC from Doc Austin on Vimeo.
Bonus Footage
Bonus Footage
I don't know anything about this video except Kevin found this on his camera. It's at SPARKS and it looks like a nice day.


