
Its been a tough year for me when it comes to containing my excitement. While I love the new Gamebird and 60" Edge V2, the 48" Extra EXP really set me off and I've been immensely enjoying that plane almost evey day. The only thing missing in the fleet would be a 48 Edge V2, and we will soon have it.
Now we're set for the arrival of the new 48" Edge V2, which may be the most anticipated plane of the last decade. Everyone loves the Edge, especially in this size, from sport pilots and 3D newbies, all the way to hardcore 3DXA veterans.
This is where you new guys start because you need a moderately priced plane to learn 3D on. The Edge is universally accepted to be the best 3D trainer, partially because of it's superb stability, but in particular for it's impeccable harrier characteristics.
The Edge is also going to be great for veterans who want something savage in a smaller size. It's easy to fly, but still fully capable. This plane will be gentle enough for new 3D pilots to learn with, but agile enough to keep an experienced pilot fully entertained. They are going to sell out super fast, so be ready.
What makes the 48s so special is their size. It's as big as you can go and still get it in the car assembled, uses cheap batteries and equipment, stores easily and flies like a bat out of hell. Can't think of any thing more I could ask from an airplane.
They fly just fine with standard equipment but can be turned into Intergalactic Battle Cruisers set on kill with premium servos and a good stability system for not much more. I think these planes are good enough to deserve that.
Again departing from the format, we will save the flying section for the a flight report. Don't worry, we're using that time to enjoy the build and make sure everything is perfect. Should only be a few days.
V2 Improvements
We have seen how the V2 treatment has transformed planes like the 48" and 60" Extra EXP, so it was no surprise that the Edge benefited from this just as much, and in the same ways.
Generally the V2 is stronger all the way around, and it's in the air, where all this strength, and especially stiffness gives you a more precise plane. Nothing is flexing or moving, so the plane stays straight and flies straight even under the most extreme stress. This is crucial with snaps and tumbles, walls, pop tops, and other high stress maneuvers, where it helps you control the entry and exit better.


Once you figure out the timing, this makes snaps and tumbles much more precise. It's easier to make the plane come out pointed exactly where you want it, which becomes more of a precision thing than just mindlessly flopping around and waiting to see where it comes out.
You get a stiffer plane that is more lively for snaps, tumbles, and other XA moves, and a precision plane that stays in alignment no matter how much stress you put on it. Essentially you get a better flying, longer lasting plane.
KIT
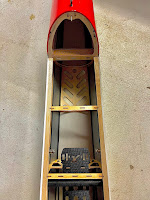
After the build I checked my photos and they were all blurry. Thankfully our friend oldlawndart (from RC Groups) was putting a red one together and offered to let me use some of his photos. So, thanks oldlawndart!
The first thing you are going to notice when you pop the hatch is the extensive use of carbon and mixed composite materials.
As strong as the V1s were, there really wasn't a lot that needed to be changed. Most of the updates to the V2 revolve around building it out of lighter, stiffer, and stronger composite material. A lighter plane is going to fly better, and a stiffer plane is going to be more lively and precise.
As seen on other V2 models, Extreme Flight is moving ahead with the extended use of carbon and mixed composite materials. Previous 48" Extras used carbon rods to support the motorbox, but the V2 has the newer, angled side motorbox, which is also heavily reinforced with carbon. This is not only more stiff than the previous motorbox, but also simplifies the design and gives you a lot more room to work when changing out the battery.


Here you can see the leading edge of the stab is notched, and the center has a flat face. You slide the stab in and pus it all the way forward until the center seats on the little alignment "formers" at the front of the stabilizer saddle. I always measure to be sure, but this method gives you are dead straight alignment.

The Edge comes with Extreme Flight's new wing quick latch system. You can see how it works in the build video. You slide the latch forward and it captures the wing bolt. Very simple and effective system.


Generally the V2 is stronger all the way around, but it's not like the V1 needed any more of that. I never broke one in the air, and even in outright crashes the planes held up extremely well. Where the V2 treatment really comes into play is in the air, where all this strength, and especially stiffness gives you a more precise plane. Nothing is flexing or moving, so the plane stays straight and flies straight even under the most extreme stress. This is crucial with snaps and tumbles, walls, pop tops, and other high stress maneuvers, where it helps you control the entry and exit better. Once you figure out the timing it's easier to make the plane come out pointed exactly where you want it, which becomes more of a precision thing than just mindlessly flopping around and waiting to see where it comes out.
Mostly this eliminates the most stressful and time consuming part of the job. I used to spend about an hour on this, but now I push the stab forward, measure it, and it's always perfect. Having a bit of OCD with these planes, I measure it over and over, and this part is probably the most time consuming part of the build.


In general the build went so easy I can heartily recommend this plane as a first balsa build. The only part of the build that took much skill and patience was the hinging, and my secrets for that are in my Miscellaneous Build And Set Up Tricks article. as well as in the build video posted in the next section.
Aside from the stab and hinging, everything else on the build is a simple bolt on operation. If you are not happy with it, simply take it apart and do it over. Since once glued, you can't do that with the stab and hinging, it makes sense to do those first when you are fresh, take your time and build patiently.
As such, your best tool is going to be patience, and forget about the claims people make about building in X amount of time. It's not a macho contest. Generally it takes me seven or eight hours, but remember, I've been building planes my whole life, had good teachers and know the tricks.
Don't rush it, and it takes as long as it takes to get it right. Mostly I enjoy working with such quality equipment and I am usually disappointed it didn't take longer. I used to hate building but now it's almost like it's another hobby. Slow down and enjoy! The Edge went together so perfectly with so little effort that it was done before I was ready to stop! After being locked down for so long with nothing to do it was a real treat to have something to build, but it went too fast! I guess I had better get a white one right away!
Hardware
I don't like a lot of change just for the sake of change, so I'm really glad Extreme Flight has kept the same hardware package we've been using since the introduction of the EXP series. It's all tough, reliable stuff that we all know forward and backward, which makes it easy to work with. It's also nearly bullet proof, but it's nice most of us have a good supply of spares built up over the years.
There are a few changes here, but they are all good. Most of the Phillips head bolts have been replaced by Xessories titanium colored case hardened allen bolts. You can use the same allen tool to check the landing gear, and cowl screws. Not only does this simplify pre-flight inspection, but they just look really good and the titanium color goes along nicely with the composite construction's modern, hi tech look.
Building
Since this is such an important plane for the new guys, Extreme Flight's product development chief, Ben Fisher, made a nice build-along video. Here he covers every step in real time, so you can prop your phone up on the bench and use the video as a guide. There are lots of great ticks and information in here, Even if you are an experienced builder, there's still plenty to learn here.
My kit also came with a conventional paper build manual, which is great for us old timers used to doing it that way, and it's nice to have so much build reference material.
Sadly, after the build I checked the photos I had taken and most of them were all out of focus. It's too late to go back and take more photos, but you can see every bit of the plane in good detail in the video.


Rudder

Most of this build was like a surgical procedure. Everything slid together, bolted together or glued together perfectly. It didn't have top trim or tinker with anything. I was kind of on auto pilot until I got to the cowling, and thankfully, at least for me, you still have to mount it yourself, and I accept that as a challenge to get it perfect. That, or it's my OCD kicking in.
If you follow the procedure in the video manual, and take your time, you can't get it wrong. I've always done mine a little differently, but this time I tried it Ben's way and got really good results. I'll probably keep doing it this way because you can't get it much better than this.
FLYING
It looks like we have bad weather for a couple of days, so we'll be back with a flight report on the first clear day.
SET UP
This is the same pushrod system we've been using on the 48" EXP for over a decade. It's been simple, bulletproof, and easy to work with.
Ailerons
Here I am using the arms that came with the servos. They are the same size as Hitec. Using the outer hole I am getting about 33 degrees of travel.

Elevator
Here I use the G10 arm extension on the standard arm. Right now I have not turned up the endpoints in my TX, and I'm at 60 degrees up elevator with down elevator maxed out. I can get s much as 72 degrees with this arm, but we're going to start off a little tamer this time. I've been using less elevators in my planes lately, so we'll try it this way. I can always turn it up if I need more.

Rudder
Again, just the standard arm. One thing I've done differently on my last few builds is move the ball link on the servo arm to the inside. This gives the pushrod a straighter shot at the control horn.

Power System
Once again, it's going to be the Torque 2814/Airboss 45 ESC power system. I have been using this combination in my 48" planes, again, for over a decade. Reliability and durability has been 100% dead solid perfect. There is more power than you actually need, with enough to give unlimited vertical performance, and throttle response is perfectly linear.

Like all Extreme Flight power systems, once you bolt the cowling on you can forget about the motor and ESC and simply fly it. Most of my 2814s and Airboss' are years old, but I have so much faith in them I will drop an old beat up one into a brand new plane with no worries. The Torque is the Maytag of electric motors.


Here you can see I solder mine up a little differently. Instead of soldering both the ESC battery leads and BEC to the deans plug, I cut back the heat shrink on the wire about halfway between and solder there. It makes putting the deans plug on much easier because you don't have to hold and solder two leads to one place.

Once again, it's going to be the Torque 2814/Airboss 45 ESC power system. I have been using this combination in my 48" planes, again, for over a decade. Reliability and durability has been 100% dead solid perfect. There is more power than you actually need, with enough to give unlimited vertical performance, and throttle response is perfectly linear.

Like all Extreme Flight power systems, once you bolt the cowling on you can forget about the motor and ESC and simply fly it. Most of my 2814s and Airboss' are years old, but I have so much faith in them I will drop an old beat up one into a brand new plane with no worries. The Torque is the Maytag of electric motors.
I cut a small strip of balsa to use as an ESC mount. It's a good place to place the velcro, but it also raises the ESC up just enough that you can slide it back over the next former if you want to slide it back. I'm balanced according to the manual, but if I care to move the CG back I can slide the ESC back a little.

BEC
For 8 volt servos you either need a 2s lipo or an external BEC. I chose the BEC because they are not that hard to solder up, and once installed you simply forget about them. I have always used the Castle 10 amp BEC on all my 8 volt planes, and again, am delighted with the reliability and durability.
For 8 volt servos you either need a 2s lipo or an external BEC. I chose the BEC because they are not that hard to solder up, and once installed you simply forget about them. I have always used the Castle 10 amp BEC on all my 8 volt planes, and again, am delighted with the reliability and durability.

Here you can see I solder mine up a little differently. Instead of soldering both the ESC battery leads and BEC to the deans plug, I cut back the heat shrink on the wire about halfway between and solder there. It makes putting the deans plug on much easier because you don't have to hold and solder two leads to one place.
I usually mount the BEC on the fuselage side down low, but this time I tried something different. On this plane I mounted it against the front of the landing gear block. This puts it dead center in the airflow coming in from the chin scoop. I've never had a problem overheating one before, but this is a better place for it, especially once summer gets here.

If you are running 6 volt servos, the standard Airboss will feed those just fine.
No comments:
Post a Comment